Well, not to make this sound like a pity post, but filming has been shut down until April or May at the latest now.
Why? Because someone broke into my apartment and stole my camera. That's about it. I went out for coffee around 10 this morning, came home about 40 minutes later and noticed a window beside my door had been smashed - which is kinda sad considering the pane right next to it actually had no glass at that point so I'm no sure why they didn't just use that. Anyway, stupid criminals aside, at first nothing looked wrong, not muddy footprints even - so I guess they were polite enough to wipe their shoes first.
I thought at first it may have been my landlord's handyman, for whatever reason he'd smash I window I don't know, just the most logical thing that made sense at the moment. I asked my landlord, nope wasn't that - so I chalked it up to a failed break-in attempt because nothing seemed disturbed in the apartment, other then Scully (my cat) but she acts weird sometimes anyway. Then, about 10 minutes later I was struck with the thought: "What about the camera?"
And sure enough, there it wasn't.
Now, what makes this a little on the sketchy side is that whoever this was, one or several, had to pass by everything else in the apartment before finding the camera tucked away in a dark corner. At this point you think, inside job - not to be too melodramatic about it. But I seriously doubt it, since the camera is normally never sitting there and it's obvious nothing else was disturbed.
I call the cops, showed up in about 10 minutes. All the while I see a city truck parked outside. Turns out someone also broke into the dentist's office next door (and they have a security system that apparently never went off), and when the cop showed up the city truck pulls into the driveway with him - with a TV someone found hidden in the bushes in their driveway, not less the 3 houses away. I assume the TV came from the office, no one's there today so I have no idea what happened over there.
An stupid me without apartment insurance. Some of us have to learn the hard way. In any case, the camera isn't irreplaceable - it was on it's last legs really. I'm more annoyed about the storage drive, luckily all the footage was taken off the drive so nothing there was lost - it just means I have no means of shooting the rest of the movie now. I do start work in about 2 weeks, so I will be able to afford to get things back up and running if all works out, but I won't have enough to buy a new camera until March at the earliest.
So, everyone involved in the movie who reads this; Take a break, and don't worry about filming any time soon.

Saturday, December 23, 2006
Monday, December 18, 2006
Homemade Steadicam...and not much else
It's been quiet, no filming going on, not even really working on anything. Since I'm taking time off I decided to actually take time off instead of working on another part of the project. Well, that's not entirely true. I did do some location scouting and built a homemade steadicam.
I'd seen articles and plans on how to make steadicams several dozen times over the years, I've even looked at buying them - ultimately I never bothered with any of it. The homemade ones all seemed too much work for no real results, the pro ones just seemed way overpriced for what small use I'd really have for them (not much of a handheld fan since it buggers up any FX).
So a friend of mine, Derek Martin (Grayson, in the movie) sent me an email with a link to another persons site claiming to have a $15 steadicam. I checked it out - it was pretty McGyveresque. Then I figured, what the hell - it cost me more then $15, I neither had the luxury of the same stores this guy did or US prices, still only about $25 so no real complaints.
Finding the right parts without the hassle of running here and getting this drilled and going there and getting this cut and rethreaded was a bit of a pain in the ass. The whole point of something like this is the ease of finding the parts and assembling them - because the ultimate finished product is of only so much use so it's a little ridiculous to put that much effort into it. It's like, why bothering travelling all the way on horseback to a hidden village in Tibet for a special coffee cup, when you really don't drink coffee all that much.
So after a couple hours running around, I found one store that had all the parts, had to go to get two pieces of galvanized steel drilled and that was it. And that's about all the effort needed to make a weird looking t-bar thing with a barbell weight on one end. Not a perfect steadicam, but it actually does make a difference in the quality of handheld shots. It's not "balanced" in the sense a real steadicam should be, more like it's just weighted down to keep down excess wobbling and given a different axis to hold the camera on that helps also.
Overall, it's not too bad, do I have much use for it? Not really. I have a few shots where I can use it and it will help. I'll probably design a few shots to use it just to make use of certain sets and locations. Who knows, I might become more accustomed to it and use it more often, although I'm seriously considering this being one of the last movies I work on - live action at least.
Otherwise, the problem of a lost location that caused a major setback in shooting is more or less taken care of. I've found a place, very similar to what I had before - only this one offers a much wider variety of shots and angles. I've yet to actually secure it for shooting, but I've got a better handle on what needs to be taken care of first before I go in and shoot. So in the new year I'll be working on that and hopeing by mid-January we'll be back up and running and we'll finall wrap this thing up.
And that's it, this is probably the last post for sometime until things get back up and running.
Thursday, December 07, 2006
More FX stuff
For the last couple weeks since there’s been no filming going on, I’ve been working on some special effects and post stuff, as you may have noticed obviously. In particular I’ve been muddling through The Library scene, trying to prep the footage for the addition of the computer generated elements - by “prep the footage” I mean cleaning it up and whatnot.
I’ve also been working at creating some of the smaller computer generated elements. The Book of the Skull prop now has a digital counterpart, as well as the Jim-Jim prop, and I’ve been fiddling with some designs for the Library set and the Librarian himself.
I thought I’d do a quick breakdown of how much work goes into a single shot, by showing it layer by layer.
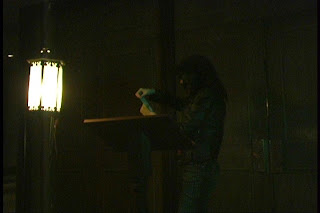
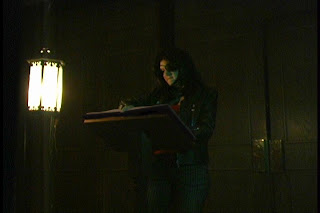
First we start off with a clean plate - the original footage, totally untouched. You can see that around the outer edges of the doorframe the walls are still visible, as well as a sliver of light from the crack in the door. So first off they’ll have to be removed.
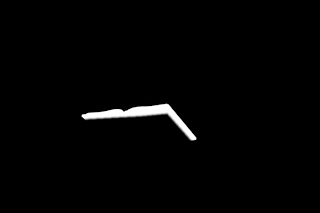
 Since the shot was locked off (on a tripod and unmoving) it’s pretty easy to create a mask to block out those areas and just turn them into dark patches (which is what I want). Here you see the mask.
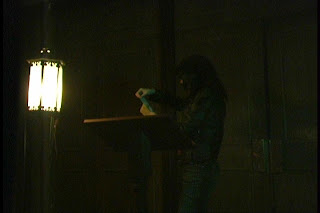
 Instead of just using black, I actually took a 10 second clip off the camera with the lense cap still on, so instead of a jet black, I get a grainy black - which matches the footage more accurately so it doesn’t seem too weird to the eye. And combined with the mask, we get this:
 Now, at the very end of the shot, which is 272 frames long (30 frames per second), you can see the Malice crosses over in front of the door. That won’t work, so I created a rotospline mask copying her movements across the door, this mask is a full 272 frame video clip since it’s masking out the motion of an actor (I think I explained this process before so I’ll skip it here, if you want, search around here for some more info on it).
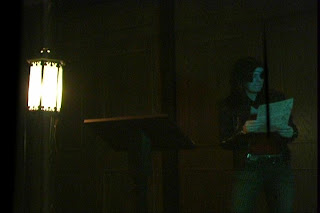 Here’s a still shot of from the mask of Malice crossing in front of the door. Luckily it only requires a small part to be masked out over roughly 30 frames, so the mask doesn’t have to be completely accurate, just where the sliver of light needs to be removed.
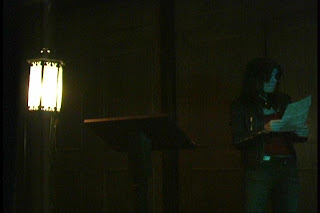
 The two masks are then combined, the still frame and the rotosplined mask to create this. Just a still image of the final composite. Not really much to see so far.
 And now you can see the when Malice crosses in front of the door it works like it should. This is just the first step, All I’ve done is clean up footage at this point (note that I actually already cleaned up the burned out pixels if you recall those little buggers).
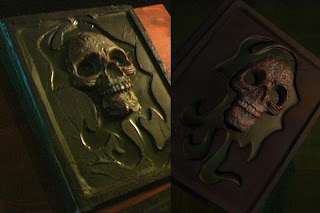
 Now that’s done, I need to add the computer generated element - which is the digital version of The Book of the Skull. First I had to scan in the entire book from as many angles as possible, model it and finally turn out this. Here’s a side by side comparison of the two books, the real one on the left, the digital one on the right. It’s not perfect, but it’s close enough for what it’s needed for - the digital one will require some post work to make it match the quality of the footage.
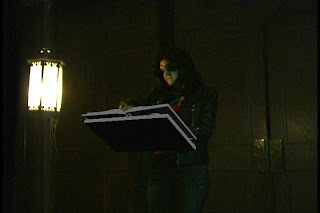
 So, we start be setting up the scene. I purposely shot the scene with the pedestal empty in order to insert the digital book later - you might have noticed that actually. Here’s a quick render of the shot with the book added in. The block you’re seeing under the book is used for camera matching - in order to get the same angle and whatnot of the original plate - so the book ends up being shot from the exact same angle. Camera matching is a long, sometimes painful, process I won’t get into.
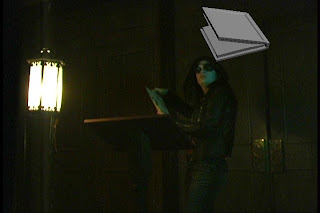
 From there I do a rough animation of the book flying up off the pedestal and hovering for a second before flying off, which Heather had to try and react to. So then I refine it a bit more, trying to make it match what’s going on in the scene, in this case instead of having Heather react to a sequence of things going on to match the “to be added” book, I just walked her through it knowing I could just add the book and make it match with her actions instead. So I just told her to look up at a spot that made sense to her, then when I added the book I just lined it up as best I could to make it appear as though she’s actually looking at it.
 Then we do a final render of the book animation. The textures, lighting and an added motion blue make it look much better. I won’t go into the process of how the book was actually made, I might do that at some other point for another digital prop or actor.
 Now that I have my final book animation I still need to composite it into the shot. And since there’s a few things that need to be done to the footage to hopefully make it match a little more seamlessly, I have to create a mask for the book itself.
This is pretty easy, I just render another version of the animation, removing the lights, background and textures so I get a quick mask version of the footage. Also, the reason I render the animation against the original footage, is because otherwise you tend to get a bit of a “glow” surrounding the computer generated parts.
 And since the book has to appear to be on the pedestal, another quick mask and a still frame one are added to block out the pedestal.
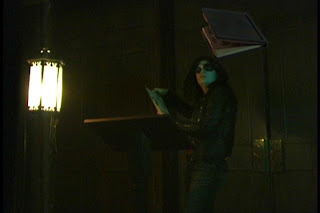
 So with a complete mask for the book I add it with the cleaned up live action footage and this is what we get. You can see the shadows and whatnot of the book are just way to harsh to make it feel like it’s actually part of the original shot.
 So I do some quick touch ups, adding some noise to simulate the same noise the live action footage has, adjusting the colour balance and brightness and contrast to get as close as I can. Not always easy to do and it doesn’t always work, so sometimes you just have to settle for “as close as I can”. The changes may be a little too subtle to be noticed here, but blown up on a large scale, it'd be really noticable.
 That’s pretty much it, there’s a few other things I’ll add in - like a bit of a bloom off the lantern to help bring the elements together a little better, that’s really it. Otherwise this is the process I go through with every shot that require a clean up and then additional computer generated elements. Not "Hollywood" perfect, but still not terrible looking.
By no means is this an easy or simple process, nor is it something only a “professional” can do. I am by no means a professional, it just takes a buttload of patience and practice and of course the right software certainly doesn’t hurt. I get the impression sometimes that folks who don’t really understand this side of moviemaking just pass this sort of stuff off as “oh, it’s all done by computers” - well, that might be true, but it’s a bit like assuming cars can just drive themselves around. Computer generated imagery, whether it be matte paintings, or digital actors and props, are not something that just pop out of computers, it takes an incredible amount of work to make it happen.
Having said that, I don’t mean to imply I have more talent, dedication or knowledge of this stuff then anyone else, obviously I don’t - otherwise I’d be so rich I'd pay people to write this blog for me while George Clooney and I sit on my private Caribbean beach with my supermodel girlfriends. I just have way too much time on my hands, that’s pretty much it. And a touch of OCD doesn’t hurt either I suppose.
I’ve also been working at creating some of the smaller computer generated elements. The Book of the Skull prop now has a digital counterpart, as well as the Jim-Jim prop, and I’ve been fiddling with some designs for the Library set and the Librarian himself.
I thought I’d do a quick breakdown of how much work goes into a single shot, by showing it layer by layer.
First we start off with a clean plate - the original footage, totally untouched. You can see that around the outer edges of the doorframe the walls are still visible, as well as a sliver of light from the crack in the door. So first off they’ll have to be removed.
 Since the shot was locked off (on a tripod and unmoving) it’s pretty easy to create a mask to block out those areas and just turn them into dark patches (which is what I want). Here you see the mask.
 Instead of just using black, I actually took a 10 second clip off the camera with the lense cap still on, so instead of a jet black, I get a grainy black - which matches the footage more accurately so it doesn’t seem too weird to the eye. And combined with the mask, we get this:
 Now, at the very end of the shot, which is 272 frames long (30 frames per second), you can see the Malice crosses over in front of the door. That won’t work, so I created a rotospline mask copying her movements across the door, this mask is a full 272 frame video clip since it’s masking out the motion of an actor (I think I explained this process before so I’ll skip it here, if you want, search around here for some more info on it).
 Here’s a still shot of from the mask of Malice crossing in front of the door. Luckily it only requires a small part to be masked out over roughly 30 frames, so the mask doesn’t have to be completely accurate, just where the sliver of light needs to be removed.
 The two masks are then combined, the still frame and the rotosplined mask to create this. Just a still image of the final composite. Not really much to see so far.
 And now you can see the when Malice crosses in front of the door it works like it should. This is just the first step, All I’ve done is clean up footage at this point (note that I actually already cleaned up the burned out pixels if you recall those little buggers).
 Now that’s done, I need to add the computer generated element - which is the digital version of The Book of the Skull. First I had to scan in the entire book from as many angles as possible, model it and finally turn out this. Here’s a side by side comparison of the two books, the real one on the left, the digital one on the right. It’s not perfect, but it’s close enough for what it’s needed for - the digital one will require some post work to make it match the quality of the footage.
 So, we start be setting up the scene. I purposely shot the scene with the pedestal empty in order to insert the digital book later - you might have noticed that actually. Here’s a quick render of the shot with the book added in. The block you’re seeing under the book is used for camera matching - in order to get the same angle and whatnot of the original plate - so the book ends up being shot from the exact same angle. Camera matching is a long, sometimes painful, process I won’t get into.
 From there I do a rough animation of the book flying up off the pedestal and hovering for a second before flying off, which Heather had to try and react to. So then I refine it a bit more, trying to make it match what’s going on in the scene, in this case instead of having Heather react to a sequence of things going on to match the “to be added” book, I just walked her through it knowing I could just add the book and make it match with her actions instead. So I just told her to look up at a spot that made sense to her, then when I added the book I just lined it up as best I could to make it appear as though she’s actually looking at it.
 Then we do a final render of the book animation. The textures, lighting and an added motion blue make it look much better. I won’t go into the process of how the book was actually made, I might do that at some other point for another digital prop or actor.
 Now that I have my final book animation I still need to composite it into the shot. And since there’s a few things that need to be done to the footage to hopefully make it match a little more seamlessly, I have to create a mask for the book itself.
This is pretty easy, I just render another version of the animation, removing the lights, background and textures so I get a quick mask version of the footage. Also, the reason I render the animation against the original footage, is because otherwise you tend to get a bit of a “glow” surrounding the computer generated parts.
 And since the book has to appear to be on the pedestal, another quick mask and a still frame one are added to block out the pedestal.
 So with a complete mask for the book I add it with the cleaned up live action footage and this is what we get. You can see the shadows and whatnot of the book are just way to harsh to make it feel like it’s actually part of the original shot.
 So I do some quick touch ups, adding some noise to simulate the same noise the live action footage has, adjusting the colour balance and brightness and contrast to get as close as I can. Not always easy to do and it doesn’t always work, so sometimes you just have to settle for “as close as I can”. The changes may be a little too subtle to be noticed here, but blown up on a large scale, it'd be really noticable.
 That’s pretty much it, there’s a few other things I’ll add in - like a bit of a bloom off the lantern to help bring the elements together a little better, that’s really it. Otherwise this is the process I go through with every shot that require a clean up and then additional computer generated elements. Not "Hollywood" perfect, but still not terrible looking.
By no means is this an easy or simple process, nor is it something only a “professional” can do. I am by no means a professional, it just takes a buttload of patience and practice and of course the right software certainly doesn’t hurt. I get the impression sometimes that folks who don’t really understand this side of moviemaking just pass this sort of stuff off as “oh, it’s all done by computers” - well, that might be true, but it’s a bit like assuming cars can just drive themselves around. Computer generated imagery, whether it be matte paintings, or digital actors and props, are not something that just pop out of computers, it takes an incredible amount of work to make it happen.
Having said that, I don’t mean to imply I have more talent, dedication or knowledge of this stuff then anyone else, obviously I don’t - otherwise I’d be so rich I'd pay people to write this blog for me while George Clooney and I sit on my private Caribbean beach with my supermodel girlfriends. I just have way too much time on my hands, that’s pretty much it. And a touch of OCD doesn’t hurt either I suppose.
Monday, December 04, 2006
Special Effects stuff
I've been playing around, testing some ideas and whatnot to make the 3D models a little more realistic looking. Or at the very least, not look like total crap. The modelling itself isn't so much the issue, that I'm becoming pretty used to - it's the final, sort of detail stuff, that gives it that extra something something.
So, I decided to put this together to show just how it more or less works.
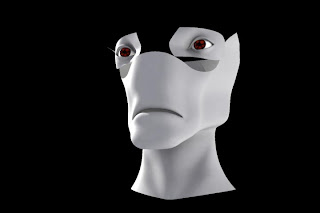
First, this is the basic model for the face of the Titan, it's unlit at this point and looks pretty dull and flat, but you can see the basic structure of the model.
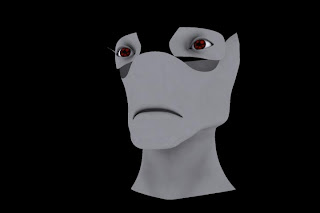
And here it is with the texture, while it looks better, still not terribly impressive because there's still no lighting, nor does it really have any depth to it.
 So here with some actual lighting, you can see a bit more of the details of the model. Here you can really see how smooth the mesh of the model is, doesn't really make him look like he's made of stone.
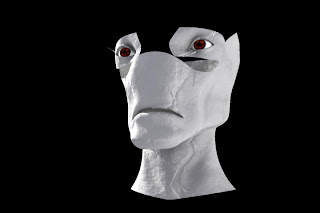
 And now with the texture again, looks much better, still a little flat though.
 This here is what's called the "bump map" and it's pretty much what it sounds like. It creates bumps and whatnot to make it looks like there more detail to the actual model. This is faked though so while it gives the illusion of detail there still really isn't any.
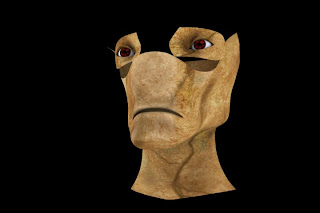
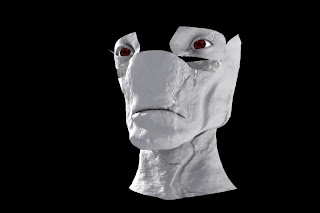
 The texture and the bump map combined make it look much better. Now this is the stage I've been at for the longest time, still not 100% thrilled, it was missing something. Since he is supposed to look like he's made of stone, the actual model itself needs to be a little more jagged and whatnot.
 That's were this comes into it. I just started playing around with this, it's kinda techincal, but bascially it's this; it's called a "displacement map" which again is pretty much how it sounds. You take a black and white image, the black part will appear sunken, while the white appears more raised - this effects the actual model. And combined with the bump map (which it is in this picture) is gives a much more detailed and stone-like effect to the model.
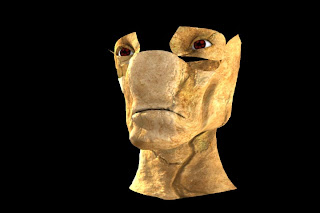
 So now we end up with this. This is everything combined, the texture, bump, and displacement maps as well as the lighting gives it a much more realistic look - as well as a stone faced looking giant statue god kind of thing can be realistic.
And these are the 2 images used to do all this, this is the bump map, also used for the displacement map as well.
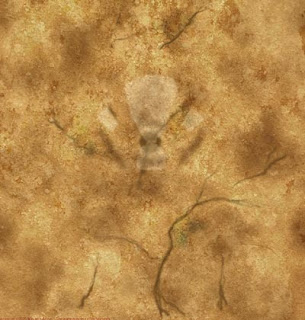
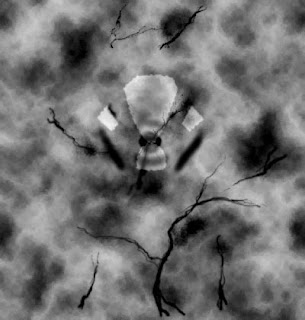 And the actual texture, or diffuse map.
This isn't the final version, you can see in a few place a couple problems that still need to be worked out in the the displacement and bump maps. I'll probably do another version of both maps and try to get a more stone-like appearance out of it. And more dramatic lighting would help, however that's not an option in this character's case since he has to match footage shot in broad daylight.
This is the process each character model will go through before it's finally animated and added into the final movie. In some case certain set pieces will use the displacement map as well to simulate more detail. The main reason being, if you tried to model this kind of detail it'd take forever, probably bugger up a million times over and would just be hell to animate - ultimately unless you're a real pro at this, it would never quite look the same and probably cause your computer to crash just by looking at it.
That's it for now.
So, I decided to put this together to show just how it more or less works.
First, this is the basic model for the face of the Titan, it's unlit at this point and looks pretty dull and flat, but you can see the basic structure of the model.

And here it is with the texture, while it looks better, still not terribly impressive because there's still no lighting, nor does it really have any depth to it.
 So here with some actual lighting, you can see a bit more of the details of the model. Here you can really see how smooth the mesh of the model is, doesn't really make him look like he's made of stone.
 And now with the texture again, looks much better, still a little flat though.
 This here is what's called the "bump map" and it's pretty much what it sounds like. It creates bumps and whatnot to make it looks like there more detail to the actual model. This is faked though so while it gives the illusion of detail there still really isn't any.
 The texture and the bump map combined make it look much better. Now this is the stage I've been at for the longest time, still not 100% thrilled, it was missing something. Since he is supposed to look like he's made of stone, the actual model itself needs to be a little more jagged and whatnot.
 That's were this comes into it. I just started playing around with this, it's kinda techincal, but bascially it's this; it's called a "displacement map" which again is pretty much how it sounds. You take a black and white image, the black part will appear sunken, while the white appears more raised - this effects the actual model. And combined with the bump map (which it is in this picture) is gives a much more detailed and stone-like effect to the model.
 So now we end up with this. This is everything combined, the texture, bump, and displacement maps as well as the lighting gives it a much more realistic look - as well as a stone faced looking giant statue god kind of thing can be realistic.
And these are the 2 images used to do all this, this is the bump map, also used for the displacement map as well.
 And the actual texture, or diffuse map.
This isn't the final version, you can see in a few place a couple problems that still need to be worked out in the the displacement and bump maps. I'll probably do another version of both maps and try to get a more stone-like appearance out of it. And more dramatic lighting would help, however that's not an option in this character's case since he has to match footage shot in broad daylight.
This is the process each character model will go through before it's finally animated and added into the final movie. In some case certain set pieces will use the displacement map as well to simulate more detail. The main reason being, if you tried to model this kind of detail it'd take forever, probably bugger up a million times over and would just be hell to animate - ultimately unless you're a real pro at this, it would never quite look the same and probably cause your computer to crash just by looking at it.
That's it for now.
Subscribe to:
Posts (Atom)