
To get off track - because mentioning the quick flash of a shot reminds me of something. In the movie The Man With The Screaming Brain (yes, it’s nearly as bad as it sounds, but it was written by , directed by and starred Bruce Campbell, so what can you do?), there was a scene of someone falling down the stairs, which is a pretty easy shot if you got a good stunt man. I guess they did, but at one point they used a dummy - which I guess is near unheard of in this day and age, but it was only used for a total of 7 frames. It didn’t show up as a dummy and was such a quick thing, but having that one little shot that didn’t look like something a stunt man could do really helped. Anyway, back to the point.
The shot is simple enough, just a quick glimpse of the demon lunging towards the camera. The background was shot way back when we shot the rest of the scene. So that’s my starting point. One thing I did when adding it into the scene was to try to recreate the basic geometry to the original scene - or at least where shadows might interact. I just use this for a visual reference and for the lights in the 3D model to cast shadows where they’re needed. After this I set the lights up as best I can to get the same light as is in the live action shot. *The shots might look a little blurry, there’s a reason for that I will get into when the time comes.
The original shot.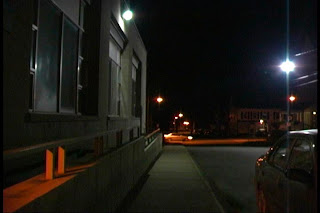
Now with some basic 3D models overlapping where needed. The model of the car is very basic, not used for shadows (it'll have more detail's probably in the final version), but for adding in a bit of a reflection of the demon as it passes. Hard to get things exactly right, but this shot is so quick I’m more worried about what you see then what you don’t see - so this model is good enough for what I need it to do.
 Once that’s done I bring in the demon and get him all squared away.
There’s no lighting as of yet.

And now with some lighting. Looks a little better,
but right now there’s no texture at all to the demon.
but right now there’s no texture at all to the demon.

And there we go. This is the basic texture. I’ll actually be doing at least one, maybe two extras passes that will be composited with this footage to make the demon a little slimier and shinier.

So to start the whole process I animate the demon doing it’s thing, once it’s all rigged for animation then it’s just a matter of an hours work of fiddling to get exactly the movements I want. Then I’ll break the shot down into different passes.
First Pass: a shadow pass. Underneath everything else in this shot are the shadows. The shadows will definately need some tweaking for the final version.

Then I composite this with the original shot.

They look a little wonky, particularly the one from the orange light, it doesn't quite look natural - it'll definately be fixed for the final version.
Second Pass: This is something I don’t normally do, but this shot kind of requires it. I could probably get away without doing it, but I wanted to just to add a little more to it. And that’s a reflection, logically when the demon passes by the car he should be somewhat reflected, so like I said, I could probably get away with it since the shot is so fast, but what the hell. I might as well at least see how it looks.
The reason it’s against a black background is because it'll make it easier to composite into the live action shot. It’s not perfect by any means, but it will hopefully add another layer to the shot that makes it that much more.

See...

So that’s the background taken care of. You can see that’s it’s basically a matter of working my way up through the shot. Since the shadows and the reflections are more or less underneath or behind the main model, they get to come first. I actually had to adjust a few things specifically for the reflection, because the background street light was cranked up a bit more then it should be for the shot of the demon itself, so I could get a little bit of a bright edge to him on the left hand side, however, when seen from another angle it was way too bright. Also, the shininess of his skin was a little too much again for the reflection angle, so tweaked those 2 things until I got a basic reflection that I was happy with.
Now we’re left with just the demon itself to worry about. He’ll be rendered in a series of passes as well. The reason I do all these separate passes is for easier control of the final composition. Very rarely does a 3D shot match exactly the quality of a live action shot, it needs to be adjust, colour corrected and other things. Doing the shot in layers allows me to go in and adjust each layer as needed before I get too far and find out it’s not going to work. For instance, even the shadow pass has to be adjusted. I have to blur is just a bit, then lighten it, so it looks a little more natural.
Third Pass: the demon itself finally. This is obviously the most important pass, otherwise it’d just be an empty shot. Since this will be the main shot of the demon, he has to be perfectly finished, textured and everything, he actually should be finished before I even start any of this.

This is a pretty good start. He’s pretty much done. If I wanted, I could do his shadows as a separate pass as well, but it’s not really needed here. So I’m going to leave it at this.
I might as well point out at this point, one of the things that makes the Wyrm Demon work is the texture of his skin. It’s a bit complicated to explain, but it’s a process called Sub-Surface Scattering, or SSS. It’s used to create the appearance of a skin-like material, makes it look a little more real.
Best way to describe it is like this - if you’ve ever taken a bright light and placed your hand over it, your skin kind of glows around the edges of a bit. That’s because the light is actually going into the upper layers of your skin and the light is bouncing around a bit. Well, there’s probably a more technical and correct way to describe it, but that’s all I got. So if you still have no idea what I’m so terribly trying to describe, look at this.
WITHOUT SSS
 (there actually is a small amount of sub-surface scattering
in this picture, just dialed way back)
WITH SSS

So the difference? That’s all I’m getting at, so moving on.
Fourth Pass: the mask. You probably seen this before if you’ve been reading this blog all along. All this is for, is to remove the actual 3D element from the live action background element. With this I can colour correct and adjust the brightness and contrast and whatever I want, without effecting the original background.

This brings us to why the images look blurry. There’s a specific quality to the images produced by a digital video camera. It may look fairly crisp when you’re watching it. But when you actually take a still image and look at it you can see it’s not really. The edges tend to bleed quite a bit. However with 3D that doesn’t happen naturally. In fact it produces extremely crisp images, too much for it to match any of my live action footage.
It’s pretty easy to adjust though, in the options to render an image you can adjust all sorts of things, the only one I’m really concerned about here is the sharpness, which is fixed by adjusting a filter to more match the quality of the live action footage. In doing this is it blurs the whole image, causing even the live action to blur - that’s not a problem since it’ll all be masked out in the end.
Fifth Pass: extra shine and glow. This is pretty simple. A normal texture has the parameters to be shiny and to what degree and all that. The basic skin doesn’t really give a high shine - at least not without effecting it to the point where you might encounter too much glowing glare here and there.
So I do the basic skin material so it looks as best as it can, then I’ll add the extra shine to get that slimy look in another pass, again it makes it easier to control it without re-rendering the whole thing. The orange light in the foreground is actually pretty low - to match the real lighting. For the shine, I’ll increase it way too much, and the same for the background street light.

And that’s it. Once all this is done - and it takes quite a while to render all these passes - it’s just a matter of compositing them all together, making a few adjustments here and there (it's a much longer process then it sounds, but you get the point) and finally I get this:
 I should point out, these are pretty rough. There’s still a fair amount of tweaking to do for each pass. I’m not really happy with the way the shadows are coming out, so they’ll need to be fixed. As well as the shine, it’s a little sloppy right now, I just wanted to put this together to as a bit of a step by step example. There’s obviously a lot of steps I left out, like actually modelling and texturing - but those things are more for a tutorial or something, and incredibly boring, just so you know.
I guess the reason I would never do a tutorial on this sort of thing is because I’m making it up as I go. I honestly have no idea if any of my techniques are even slightly close to being “professional quality”, but at the same time, I really don’t care. I’m just doing this for fun and in the end it looks pretty cool, I’m not too worried about how I get there, whether or not “there’s a much faster and easier way to do that”. I’m sure there are faster and easier ways, sure it’d be nice to understand more about this, but for right now I’m not really all that concerned about it. Although, if this were my only job on this project, I would be very concerned, however I’m more interested in being efficient with my live action actors then my computer generated ones. The CG ones don’t get tired, cranky or have lives, so they’ll take as long as I damned well please to do their scenes.
Anyway, in the end, there’s 4 shots in total with this guy, so I’ll have to do this each time for each shot. The only difference being in the other 3 shots the demon isn’t interacting with the background, so there’s no need for a shadow pass, or a reflection pass. This does cut down on the amount of work and time for each shot. In total, all 4 shots, from creating the model, texturing, rigging, setting up the lighting and all the elements for the final composites - should take about a full week. Considering how relatively simple these shots and this character are, imagine how long it’ll take for some of the more major characters with actual dialogue and way more screen time.
No comments:
Post a Comment