Mounted Albino Cyclops Faerie head.
Made of latex and filled with polyfoam and a resin eyeball, the head measures 2 1/2 inches long and comes mounted on a stained plaque with mounting hardware attached. $27.50 +shipping.
A rare mutation of the Seer Faerie, a species with prophetic abilities. It's unclear whether the mutation is caused by a genetic disorder in the parents or something environmental that results in these unusually violent creatures.
While the Seer Faeries abilities are usually limited to minor visions of random future events, the Albino Cyclops Faerie's abilities are limited to only seeing the death of any number of random individuals - it's thought that the constant visions of death is what drives these creatures to madness.
It's also believed that if an Albino Cyclops Faeries prophesies your death, the fate can be avoided altogether by destroying the creature, possibly resulting in immortality.
Showing posts with label head. Show all posts
Wednesday, March 04, 2015
Saturday, June 21, 2014
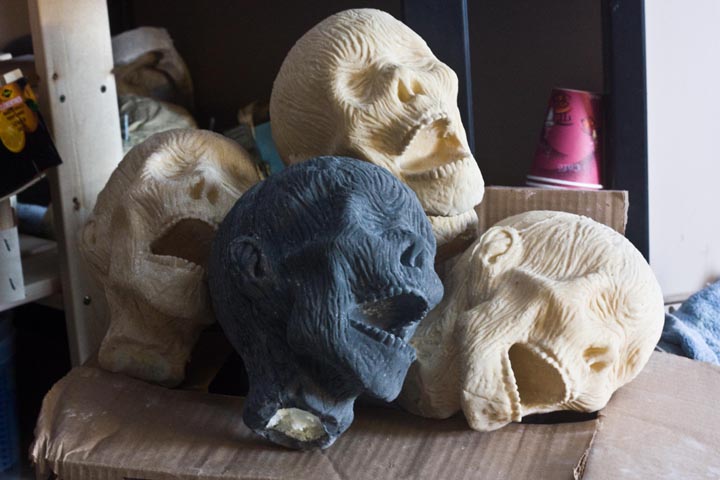
Mummy Head prop
Another prop I've been wanting to make for ages and for some reason it just never happened was a Mummy Head. It seems like every time I have an idea for something, by the time I get around to it I see several others have already attempted it - gets a little annoying because it makes me feel like I'm copying, even though I had the idea long before I saw anyone else's attempt.
The hardest part of a Mummy Head is getting it to look decent, it's not a zombie head. I went though a couple variations, basing my sculpt off a couple actual mummy head images I found, altering where I felt it just looked better.
I has sculpted and moulded it quite some time ago, I even cast it - although it was a pretty rough attempt with a really bad, broken seam. I had brushed the latex in, using up some old tinted stuff just to get rid of it. The polyfoam was kind crap as well, it just kept collapsing, but it worked well enough to make a prototype for painting.
I pretty much did the paint job without really planning ahead. It was several layers, going from dark to light until I felt it was decent looking. The teeth were done quickly with a brush somewhere inbetween the layers on the head itself so they received a little extra "aging".
So that's it. It turned out pretty well I think for what I'd call a "budget prop". I'm planning on making about 5 or so for sale eventually and I'm planning on 1 or 2 "museum" pieces. I'd love to find a cheap bell jar to display this under - unfortunately that's just one of those items you can't easily find in my corner of the world.
The hardest part of a Mummy Head is getting it to look decent, it's not a zombie head. I went though a couple variations, basing my sculpt off a couple actual mummy head images I found, altering where I felt it just looked better.
I has sculpted and moulded it quite some time ago, I even cast it - although it was a pretty rough attempt with a really bad, broken seam. I had brushed the latex in, using up some old tinted stuff just to get rid of it. The polyfoam was kind crap as well, it just kept collapsing, but it worked well enough to make a prototype for painting.
I pretty much did the paint job without really planning ahead. It was several layers, going from dark to light until I felt it was decent looking. The teeth were done quickly with a brush somewhere inbetween the layers on the head itself so they received a little extra "aging".
So that's it. It turned out pretty well I think for what I'd call a "budget prop". I'm planning on making about 5 or so for sale eventually and I'm planning on 1 or 2 "museum" pieces. I'd love to find a cheap bell jar to display this under - unfortunately that's just one of those items you can't easily find in my corner of the world.
Monday, June 03, 2013
Moonshine of the Damned, Production Journal #6
First day of shooting was postponed. Not off to a great start, but I'm no so much worried about shooting this year, I think it'll be fine if we're all a little patient. There's only 10 days needed. If we can't find 10 days over the course of the summer, than something is horribly wrong.
Lots of pictures this time around, so let's get to it.
First up, the sculpt of the leg bone prop. I was thinking, since I have a medical skeleton leg bone, that I would just do a quick alginate mould and fill it with clay to get this, but that was just a lot of wasted time and material. As well, a real femur has too much of a curve to it to accommodate the support rod, so I quickly whipped this bad boy up.
I've said before how much I really don't like doing 2 part moulds, creating that dividing wall is just so tedious and normally difficult to get just right. Have made so many of them lately though, I realized while I was doing this one that I really felt like I was finally getting the hang of it. Turned out great.
Started sculpting a couple of the custom "hero zombie" pieces needed for the movie. I wanted to make sure this time around that the FX were was detailed as I could make them. And that meant creating a single unique piece for each of the "hero zombies". This here is for the "Half Zombie" and while you can't tell here, this is our homage to the "Bicycle Girl" from The Walking Dead. It was a really quick sculpt, about half an hour.
"Piss Zombie". One of the few things to survive from the original draft, but this time he's getting a little special treatment to mess him up a little more. The actor has a beard so I wanted to make sure since I only had so much room to do a piece, that it would be very dramatic. I like it.
All the zombie pieces I'm making for the movie are just short run moulds, and since I'll only be needed one good piece from them, I will be creating as many as possible until the moulds give out and added them as a limited run for sale on the website. I'll be adding as them as they're used in the movie to have a good applied shot of them.
Return of the Zombie Frog. While I was more or less happy with how the original turned out, he was made of silicone which I find difficult to paint dramatically. Since he's only onscreen for a couple seconds I really wanted to make sure it was obvious and really stood out, so I remade him, exaggerated the silhouette a little more and he'll be made of latex. He looks very chocolatey here, I'm thinking maybe Chocolate Zombie Frogs in the future?
The finished leg bone. Latex skinned and polyfoam filled with a support rod - as usual. It turned out awesome. Really happy with this piece and how simple yet how great of a prop it is. I've been meaning to make on for over a year now and give how simple it was I'm not sure what I was waiting for.
For those interested. This will be added for sale to the website very soon, once I get this one painted and get some good pictures. They'll be $30. Feel free to get in touch now if you want to pre-order one.
Note: it's not medically accurate, if you'll recall the bit I was mentioning on the sculpt version of this piece up above. It does look pretty decent though.
The Spiked Zombie Head Mace - still really happy with this prop, can't wait to see it on screen.
A quick detail shot of the staff. The head is so distracting you don't really notice just how much work I put into the staff and how well the paint job came out.
So that's it for pictures. I've got a few more things on the go this week to prep for the coming shoots this weekend - if the weather and schedules hold out for us. It'll be nice to get back into it finally.
Lots of pictures this time around, so let's get to it.
First up, the sculpt of the leg bone prop. I was thinking, since I have a medical skeleton leg bone, that I would just do a quick alginate mould and fill it with clay to get this, but that was just a lot of wasted time and material. As well, a real femur has too much of a curve to it to accommodate the support rod, so I quickly whipped this bad boy up.
I've said before how much I really don't like doing 2 part moulds, creating that dividing wall is just so tedious and normally difficult to get just right. Have made so many of them lately though, I realized while I was doing this one that I really felt like I was finally getting the hang of it. Turned out great.
Started sculpting a couple of the custom "hero zombie" pieces needed for the movie. I wanted to make sure this time around that the FX were was detailed as I could make them. And that meant creating a single unique piece for each of the "hero zombies". This here is for the "Half Zombie" and while you can't tell here, this is our homage to the "Bicycle Girl" from The Walking Dead. It was a really quick sculpt, about half an hour.
"Piss Zombie". One of the few things to survive from the original draft, but this time he's getting a little special treatment to mess him up a little more. The actor has a beard so I wanted to make sure since I only had so much room to do a piece, that it would be very dramatic. I like it.
All the zombie pieces I'm making for the movie are just short run moulds, and since I'll only be needed one good piece from them, I will be creating as many as possible until the moulds give out and added them as a limited run for sale on the website. I'll be adding as them as they're used in the movie to have a good applied shot of them.
Return of the Zombie Frog. While I was more or less happy with how the original turned out, he was made of silicone which I find difficult to paint dramatically. Since he's only onscreen for a couple seconds I really wanted to make sure it was obvious and really stood out, so I remade him, exaggerated the silhouette a little more and he'll be made of latex. He looks very chocolatey here, I'm thinking maybe Chocolate Zombie Frogs in the future?
The finished leg bone. Latex skinned and polyfoam filled with a support rod - as usual. It turned out awesome. Really happy with this piece and how simple yet how great of a prop it is. I've been meaning to make on for over a year now and give how simple it was I'm not sure what I was waiting for.
For those interested. This will be added for sale to the website very soon, once I get this one painted and get some good pictures. They'll be $30. Feel free to get in touch now if you want to pre-order one.
Note: it's not medically accurate, if you'll recall the bit I was mentioning on the sculpt version of this piece up above. It does look pretty decent though.
The Spiked Zombie Head Mace - still really happy with this prop, can't wait to see it on screen.
A quick detail shot of the staff. The head is so distracting you don't really notice just how much work I put into the staff and how well the paint job came out.
So that's it for pictures. I've got a few more things on the go this week to prep for the coming shoots this weekend - if the weather and schedules hold out for us. It'll be nice to get back into it finally.
Labels:
alginate,
bone,
femur,
foam,
foam latex,
frog,
head,
latex,
mace,
polyfoam,
props,
prosthetic,
sculpture,
spiked,
zombie
Tuesday, May 28, 2013
Spiked Zombie Head Mace!
It's finally done and I'm pretty damned happy with how it turned out.
I will at some point very soon be selling just one on ebay as part of the fundraiser. And I will be selling a limited number, probably 10, later in the summer on the website. Although if you're reading this and you just can't wait, feel free to email me about it. The price will be $150.00 CAD.
It takes a long time to create each piece, there's 10 in total. 8 spikes, the head and the staff. Right now I only have one mould for the spikes, so that's what makes it take a little long - I'll be creating about 3 moulds in for the future ones.
Each spike is embedded in a whole cut in the head, with a small amount of the foam removed, and where each part joins, it's given a coat with latex. That bonds them together really well - however I'm sure if you really want to destroy it you could - why you'd try, I don't really know.
It's about 45 inches long. The staff is 30 inches - and could be shortened for anyone who wants one, but wants a shorter staff.
A fibreglass rod is placed into the latex skinned mould as the polyfoam is expanding, so it's bonded with the staff really well. Enough of the rod is left extending from the staff and them the head is impaled in it, giving the whole piece some stability.
This specific finished piece only had one rod, so it's a little wobbly - however for the movie I think it just adds another level of campiness, so I'm happy with it. For any sold I'll use 2-3 rods to improve stability. Unless people like wobbly.
Painting took place over 2 days, about 3-4 hours in total I'd guess. I wasn't really keeping tracking. I just used Monster Makers Latex Paint Base and some acrylic paints, works perfectly.
Also, I think for any retail versions, I'll allow for some customization, colours, spike placement, any damage to the head, blood splatter. I kept this one clean and free of damage since it's part of the movie and it will be getting bloody on it's own.
UPDATE: I'm selling one of these on ebay right now: http://www.ebay.ca/itm/111084065279?ssPageName=STRK:MESELX:IT&_trksid=p3984.m1555.l2649
I will at some point very soon be selling just one on ebay as part of the fundraiser. And I will be selling a limited number, probably 10, later in the summer on the website. Although if you're reading this and you just can't wait, feel free to email me about it. The price will be $150.00 CAD.
It takes a long time to create each piece, there's 10 in total. 8 spikes, the head and the staff. Right now I only have one mould for the spikes, so that's what makes it take a little long - I'll be creating about 3 moulds in for the future ones.
Each spike is embedded in a whole cut in the head, with a small amount of the foam removed, and where each part joins, it's given a coat with latex. That bonds them together really well - however I'm sure if you really want to destroy it you could - why you'd try, I don't really know.
It's about 45 inches long. The staff is 30 inches - and could be shortened for anyone who wants one, but wants a shorter staff.
A fibreglass rod is placed into the latex skinned mould as the polyfoam is expanding, so it's bonded with the staff really well. Enough of the rod is left extending from the staff and them the head is impaled in it, giving the whole piece some stability.
This specific finished piece only had one rod, so it's a little wobbly - however for the movie I think it just adds another level of campiness, so I'm happy with it. For any sold I'll use 2-3 rods to improve stability. Unless people like wobbly.
Painting took place over 2 days, about 3-4 hours in total I'd guess. I wasn't really keeping tracking. I just used Monster Makers Latex Paint Base and some acrylic paints, works perfectly.
Also, I think for any retail versions, I'll allow for some customization, colours, spike placement, any damage to the head, blood splatter. I kept this one clean and free of damage since it's part of the movie and it will be getting bloody on it's own.
UPDATE: I'm selling one of these on ebay right now: http://www.ebay.ca/itm/111084065279?ssPageName=STRK:MESELX:IT&_trksid=p3984.m1555.l2649
Tuesday, April 09, 2013
Win a Spiked Zombie Head Mace!
I've been mentioning that as part of the Moonshine of the Damned Fundraiser that everyone who helps out gets a chance to win some zombie stuff. Well, I've finally settled on at least one of three possible prizes I'm planning on offering up.
The Spiked Zombie Head Mace is the first prop up for grabs. A limited edition version will be going online for sale later this summer for $150 (this could change slightly), so if you're like it, you got a chance to win this for only $10. Seems like a pretty reasonable trade.
The final prop will be made of polyfoam with a latex skin, it's pretty tough and durable under reasonable use - I wouldn't recommend repeatedly bashing a cactus covered with sandpaper and broken glass though. It'll have a carbon fiber rod in its core to give it some stability. The colouring will differ as well - but that can actually be your choice, as well as the number and even placement of the spikes jammed into the head.
How do you win it exactly? Well, if you hadn't noticed, I'm running a fund raising for a web series I'm doing. Head to www.themonkeyrodeo.com/BZK3 and it'll outline the various ways you can help out and later in the spring I'll be doing a draw to see who wins what stuff.
Some of the other possible prizes will be a bag of Severed Zombie Heads and a foam sledge hammer and hatchet combo or even a collection of body parts. I'll be making a final decision as the props are made and decide what would be most interesting.
If you're interested, you can also email me at brains@themonkeyrodeo.com for more information as well.
The Spiked Zombie Head Mace is the first prop up for grabs. A limited edition version will be going online for sale later this summer for $150 (this could change slightly), so if you're like it, you got a chance to win this for only $10. Seems like a pretty reasonable trade.
The final prop will be made of polyfoam with a latex skin, it's pretty tough and durable under reasonable use - I wouldn't recommend repeatedly bashing a cactus covered with sandpaper and broken glass though. It'll have a carbon fiber rod in its core to give it some stability. The colouring will differ as well - but that can actually be your choice, as well as the number and even placement of the spikes jammed into the head.
How do you win it exactly? Well, if you hadn't noticed, I'm running a fund raising for a web series I'm doing. Head to www.themonkeyrodeo.com/BZK3 and it'll outline the various ways you can help out and later in the spring I'll be doing a draw to see who wins what stuff.
Some of the other possible prizes will be a bag of Severed Zombie Heads and a foam sledge hammer and hatchet combo or even a collection of body parts. I'll be making a final decision as the props are made and decide what would be most interesting.
If you're interested, you can also email me at brains@themonkeyrodeo.com for more information as well.
Monday, April 08, 2013
Moonshine of the Damned, Production Journal #2
Finally got a finished craft of the script - at least this latest carnation of it. I had added another character to help further complicate things and it seems to have worked pretty well so far. While I won't go into details since I'm trying to keep a lot of things in the series as under wraps as possible, but I will say this new character is called the Zombie Eater. Just another level of oddness to the plot.
It runs about 71 pages, I had hoped to trim it back a bit to make it shorter and easier to shoot, but I've cut back as much as possible without gouging into the story, so this could easily be stretched to a full feature length movie if I wanted - but I'm not too concerned about it for now. 71 pages it is.
In other news, I'm working away on some minor props and designing some makeups. Still struggling with the budget, so I've been working on finding ways of cutting back and doing things a little less expensively. One of the things I'm looking at trying is making my own plaster bandages - in order to do the life casts, I think I have 4, maybe 5 to do, I'll need plaster bandages for the support shells of the alignate mould - however, that stuff is really expensive when you need the amount I do.
Normally just a single face mould isn't too bad, $20 or $30 usually does it. But I'm doing a full head and shoulder mould of up to 5 people...that's going to suck up a lot of money. So I'm hoping the medical gauze and plaster of paris technique I've been looking into will do it. I budgeted the using regular plaster bandages would have run me round $300, not looking forward to spending that much money on something that I can't reuse. The alginate I have no choice, but I'm fine with that.
As far as the other props go, I've got my Zombie Heads all set to go, just need more latex and polyfoam to crank out more. And while this wasn't written into the script, I feel I need to do this to add a little more flavour to some shots, so I'm making a few body parts. I've got a hand, that's need as a stand-in first and foremost, but I'm going to throw in a mangled up version in there somewhere as well. I'm looking at possibly doing a foot and maybe even a whole leg if the budget happens.
At lot of these props are just background stuff, not plot crucial.
Here's the Zombie Heads, at least 4 of them. I'm planning on making a whole lot more and eventually jamming them on pikes. The original one, the upper right, was painted somewhat more natural flesh colour, but the others I went with a greenish tone that I really like. There's a cartoonish quality to them I really like.
Another prop I did this week, a fake rock. Pretty simple stuff, but it was in the script and while not totally necessary to have done it in foam, I like to do things safe - a foam rock is way safer to have the actors waving around than a real one. If you're interested in how it was made, I did a post on that earlier this week: http://bureau51.blogspot.ca/2013/04/making-fake-rock.html
Clay hand. I didn't sculpt this entirely, it's from a life cast, I did need to clean it up a bit since the clay didn't settle properly in the mould leaving some gaps and ridges here and there.
And, I did up a quick concept for the Spike Zombie Head Mace for the series, I'm hoping to get this made as soon as possible, just need more supplies.
I'm hoping to get to doing some prosthetics sculpted this week, I'm doing some of the hero zombie characters and mostly likely starting with the Pale Zombie character.
It runs about 71 pages, I had hoped to trim it back a bit to make it shorter and easier to shoot, but I've cut back as much as possible without gouging into the story, so this could easily be stretched to a full feature length movie if I wanted - but I'm not too concerned about it for now. 71 pages it is.
In other news, I'm working away on some minor props and designing some makeups. Still struggling with the budget, so I've been working on finding ways of cutting back and doing things a little less expensively. One of the things I'm looking at trying is making my own plaster bandages - in order to do the life casts, I think I have 4, maybe 5 to do, I'll need plaster bandages for the support shells of the alignate mould - however, that stuff is really expensive when you need the amount I do.
Normally just a single face mould isn't too bad, $20 or $30 usually does it. But I'm doing a full head and shoulder mould of up to 5 people...that's going to suck up a lot of money. So I'm hoping the medical gauze and plaster of paris technique I've been looking into will do it. I budgeted the using regular plaster bandages would have run me round $300, not looking forward to spending that much money on something that I can't reuse. The alginate I have no choice, but I'm fine with that.
As far as the other props go, I've got my Zombie Heads all set to go, just need more latex and polyfoam to crank out more. And while this wasn't written into the script, I feel I need to do this to add a little more flavour to some shots, so I'm making a few body parts. I've got a hand, that's need as a stand-in first and foremost, but I'm going to throw in a mangled up version in there somewhere as well. I'm looking at possibly doing a foot and maybe even a whole leg if the budget happens.
At lot of these props are just background stuff, not plot crucial.
Here's the Zombie Heads, at least 4 of them. I'm planning on making a whole lot more and eventually jamming them on pikes. The original one, the upper right, was painted somewhat more natural flesh colour, but the others I went with a greenish tone that I really like. There's a cartoonish quality to them I really like.
Another prop I did this week, a fake rock. Pretty simple stuff, but it was in the script and while not totally necessary to have done it in foam, I like to do things safe - a foam rock is way safer to have the actors waving around than a real one. If you're interested in how it was made, I did a post on that earlier this week: http://bureau51.blogspot.ca/2013/04/making-fake-rock.html
Clay hand. I didn't sculpt this entirely, it's from a life cast, I did need to clean it up a bit since the clay didn't settle properly in the mould leaving some gaps and ridges here and there.
And, I did up a quick concept for the Spike Zombie Head Mace for the series, I'm hoping to get this made as soon as possible, just need more supplies.
I'm hoping to get to doing some prosthetics sculpted this week, I'm doing some of the hero zombie characters and mostly likely starting with the Pale Zombie character.
Labels:
bimbo,
concept,
damned,
fund raiser,
hand,
head,
killers,
mace,
monkey,
moonshine,
production,
prosthetics,
rodeo,
spiked,
undead,
web series,
zombie
Thursday, April 04, 2013
Brain Keychain and Zombie Head Magnet Combo
I made these a while ago and really never did much with them, I decided to give them a proper paint job, gloss them up and now I'm going to offer up some Zombie Head Magnets for sale as part of the Moonshine of the Damned Fund Raiser.
The Brain Keychain and Zombie Head Magnet combo is being sold for $15, only 10 sets are available. The Zombie Head Magnet is made of the same resin as the Brain and given a gloss coating as well, and the magnet is a pretty strong as well.
Or, you can just get yourself a Zombie Head Magnet by itself for $10 as well, there's only 20 being made. They're all hand painted and the dye for the resin is mixed by hand as well, so there's a bit of variety to the colours, but I'm trying to keep them as close as possible - you can see they're all various shades of greenish though.
As usual, payments can be made through Email Interact and add $0.50 per item if you're using Paypal. Shipping in Canada is $15 and in the US is $10 - at least it should be, I haven't shipped on yet but they're close in size to the Brains and will ship in the same sized padded envelope - so I'm hoping for the best.
You can email me brains@themonkeyrodeo.com if you'd like one.
The Brain Keychain and Zombie Head Magnet combo is being sold for $15, only 10 sets are available. The Zombie Head Magnet is made of the same resin as the Brain and given a gloss coating as well, and the magnet is a pretty strong as well.
Or, you can just get yourself a Zombie Head Magnet by itself for $10 as well, there's only 20 being made. They're all hand painted and the dye for the resin is mixed by hand as well, so there's a bit of variety to the colours, but I'm trying to keep them as close as possible - you can see they're all various shades of greenish though.
As usual, payments can be made through Email Interact and add $0.50 per item if you're using Paypal. Shipping in Canada is $15 and in the US is $10 - at least it should be, I haven't shipped on yet but they're close in size to the Brains and will ship in the same sized padded envelope - so I'm hoping for the best.
You can email me brains@themonkeyrodeo.com if you'd like one.
Labels:
bimbo,
brain,
damned,
fund raiser,
head,
killers,
magnet,
monkey,
moonshine,
resin,
rodeo,
undead,
web series,
zombie
Thursday, March 14, 2013
Painted Zombie Head Prop
There's only so many variations on this title I can do before I start repeating.
In any case, I finally got to painting one of the Severed Zombie Head props I'm making for Moonshine of the Damned - and the funding campaign. It was my first time using the airbrush on a prop and using the Latex Paint Base to do this sort of thing, and I'm pretty happy overall with the results.
I didn't have a huge array of paint colours to use, I think I just had 5 different ones to do this. I wanted to go with a dried out look, nothing too spectacular or anything, for my first attempt. I'll probably get more creative as I go.
And since they're latex and polyfoam, I was thinking to make some variations I could cut out certain parts and rebuild them here and there to alter the overall shape and appearance of each head. Some might have some stringy bits from the neck, some might have severe shotgun wounds taking off a huge chunk of the side of their head. Who knows?
So here's a couple pictures, here's an unpainted one next to the painted one.
Some closeups. I did a slight dried splatter look on him. A technique I'll admit to having never really tried before.
Got some major spatter on this side.
And a nice one here. I didn't want to do too much more, thought it might start looking too silly. Although, I do enjoy it when things look a little silly.
So there you have it. A fully finished and painted Severed Zombie Head prop. I will definitely be offering these up for a limited, reduced price pre-sale sort of deal for the fund raiser. As I've mentioned, probably numerous times, I'll only be doing up 10 for the fund raiser and then I'll be only be making several for the web series - but I will put them up for sale on the website around September I think, the price will be slightly more than they were for the fund raiser - so if you're thinking about, better act now or it'll be costing you more and you'll be helping out a (sort of ) good cause.
If you're not sure what fundraiser I'm referring to, click here. And if you're too impatient to go the to website and simply must have one of these bad boys right now, email me.
I didn't have a huge array of paint colours to use, I think I just had 5 different ones to do this. I wanted to go with a dried out look, nothing too spectacular or anything, for my first attempt. I'll probably get more creative as I go.
And since they're latex and polyfoam, I was thinking to make some variations I could cut out certain parts and rebuild them here and there to alter the overall shape and appearance of each head. Some might have some stringy bits from the neck, some might have severe shotgun wounds taking off a huge chunk of the side of their head. Who knows?
So here's a couple pictures, here's an unpainted one next to the painted one.
Some closeups. I did a slight dried splatter look on him. A technique I'll admit to having never really tried before.
Got some major spatter on this side.
And a nice one here. I didn't want to do too much more, thought it might start looking too silly. Although, I do enjoy it when things look a little silly.
So there you have it. A fully finished and painted Severed Zombie Head prop. I will definitely be offering these up for a limited, reduced price pre-sale sort of deal for the fund raiser. As I've mentioned, probably numerous times, I'll only be doing up 10 for the fund raiser and then I'll be only be making several for the web series - but I will put them up for sale on the website around September I think, the price will be slightly more than they were for the fund raiser - so if you're thinking about, better act now or it'll be costing you more and you'll be helping out a (sort of ) good cause.
If you're not sure what fundraiser I'm referring to, click here. And if you're too impatient to go the to website and simply must have one of these bad boys right now, email me.
Labels:
bimbo,
fund raiser,
head,
killers,
latex,
monkey,
prop,
rodeo,
severed,
undead,
web series,
zombie
Tuesday, March 12, 2013
More Zombie Heads
A small pile of unpainted, latex skinned, polyfoam Zombie Heads made for Moonshine of the Damned. I'm tying to get some of the FX prepped early for the series using what little materials I have lying around. In this case I ran out of polyfoam - didn't have that much to begin with, but what little I had went decently long way. This was about 1/4 of a $40 kit, maybe a 1/3 at best - so I should be able to get quite a few more from a new kit, especially since I now know the exact amount needed to fill the heads without wasting very much of the foam.
I'm looking into some new zombie prosthetics this week as well, I normally like to master mould them so I can reuse them for the shop later, but in this case I'll just be making them and setting them aside for now until I can master mould them down the road some time.
Still looking to raise money for the series as well, we're still hovering around the 1/4 mark - got a very long way to go yet. If you're interested in helping out, check out the page I've got set up: http://www.themonkeyrodeo.com/BZK3/
I'm looking into some new zombie prosthetics this week as well, I normally like to master mould them so I can reuse them for the shop later, but in this case I'll just be making them and setting them aside for now until I can master mould them down the road some time.
Still looking to raise money for the series as well, we're still hovering around the 1/4 mark - got a very long way to go yet. If you're interested in helping out, check out the page I've got set up: http://www.themonkeyrodeo.com/BZK3/
Labels:
bimbo,
damned,
fund raiser,
head,
killers,
latex,
monkey,
moonshine,
polyfoam,
prop,
rodeo,
severed,
undead,
web series,
zombie
Sunday, March 10, 2013
Making a Severed Zombie Head
For the upcoming Moonshine of the Damned, I need to make several zombie heads - so the easiest, cheapest way was to sculpt one. Rather than starting from scratch I use an already made silicone mould from the first attempt at the series, this here was the final product from that mould, a foam backed Vytaflex head. It didn't look the way I wanted it to, so resculpting was necessary.
I filled the silicone mould with melted clay and resculpted it. I was using Monster Makers clay, that stuff is awesome.
Since it'll have to be a 2-sided mould, so next a dividing wall was built up. I also sculpted in where the pour hole will be - you can kind of see it at the base of the neck here.
First layer of Ultracal 30, first it was brushed on and then anount coat dripped over that.
And then some layers of burlap.
And another thickened coat of Ultracal 30 to give it a better finish, this picture was before I smoothed it all out.
With the first half all done, I started work on the 2nd by cleaning off all the clay.
I added several little chunks of clay to create holes to assist in prying the two halves apart afterwards. I also applied a coating of vaseline to the Ultrcal to make sure the two halves didn't just fuse together.
A mould wall for the 2nd half is built, as well as the 2nd half of the pour hole - it's a little more obvious here.
First thin brushed on coating of UltraCal 30.
Drip coating.
And I missed taking a picture - not that it matters though, it just looks like a huge chunk of gypsum. After a long while of very carefully prying the two halves apart, this is what it looked like. I use wooden stir sticks hammered in around the seam to slowly pry it apart. It worked pretty well as using hard, metal tools can just break the Ultracal sometimes and ruin the whole thing.
Luckily I was actually somewhat smart about it. Because I only had so much clay and not enough to totally fill the original silicone mould, I added in a bunch of old small silicone moulds to add some bulk - this made it easier to remove it from the mould as well since it wasn't a solid chunk of clay.
After a very long cleaning process, the mould was ready for it's first casting.
The intention is to make several cheap, light, easy to paint zombie heads. The best method I could think of was a polyfoam head with a latex skin. Since I was using latex I went with the Ultracal 30 mould - which was awesome since I already have a decent amount onhand anyway.
If you're not familiar with how Ultrcal (or really any gypsum material) and latex work together, the Ultracal actually sucks the water out of the latex, enabling you to create a thin skin. The longer you leave the latex dwelling in the mould the thicker this skin will be. I my case I need just a thin enough skin to protect the Ultracal from the polyfoam, normally you'd want enough latex to totally fill the mould to create something thicker.
I only have a little onhand so I just did a quick brush on coating to ensure it was evenly coating the deeper recesses on the front of the face, joined the halves together and sloshed around more latex, probably about 500 ml at this point. The latex was drained and I usually paint on more around the opening of the pour hole (again to prevent the expanding polyfoam from biting into the outside of the mould).
The polyfoam will normally adhere and lock into the Ultracal and it's a bugger to paint as well, hence the whole latex skin. I was using a very quick expanding and curing polyfoam (from Monster Makers) so I had to be quick about it, I made the pourhole larger than normal to make sure I could pour the foam in fast enough. It worked perfectly.
And here's the result, fresh from the mould.
I cut off the excess latex/foam from the pourhole and here's the pretty much final piece ready to be cleaned up and painted.
Normally latex can be a bugger to paint, you need to make a toxic concoction to make sure the paint adheres to the latex surface, however Monster Makers has a Latex Paint Base which works beautifully, you can even just mix it with regular acrylic paint to tint it. I've done a small amount of airbrushing with it, but need to experiment further - which I'll probably do with these since they don't have to look perfect, they are just rotting heads after all.
Also, since it has a very thin surface of latex, which keeps it really flexible and tough, and the expanding polyfoam is really low density, these heads are incredibly light and pretty squishy as well, so you can throw them at people without hurting them - if you ever feel the need to throw a severed zombie at someone.
So that's pretty much it. I can make several dozen heads from this, possibly more if I'm careful with the mould so the polyfoam doesn't ruin the moulding surface.
While only about a dozen are needed for a couple scenes in the series and this mould should last for awhile, I'm planning on making these available through the Funding Campaign for about $40, I'll only be making 10 of these for the campaign - more on that later.
I filled the silicone mould with melted clay and resculpted it. I was using Monster Makers clay, that stuff is awesome.
First layer of Ultracal 30, first it was brushed on and then anount coat dripped over that.
And then some layers of burlap.
And another thickened coat of Ultracal 30 to give it a better finish, this picture was before I smoothed it all out.
With the first half all done, I started work on the 2nd by cleaning off all the clay.
I added several little chunks of clay to create holes to assist in prying the two halves apart afterwards. I also applied a coating of vaseline to the Ultrcal to make sure the two halves didn't just fuse together.
A mould wall for the 2nd half is built, as well as the 2nd half of the pour hole - it's a little more obvious here.
First thin brushed on coating of UltraCal 30.
Drip coating.
And I missed taking a picture - not that it matters though, it just looks like a huge chunk of gypsum. After a long while of very carefully prying the two halves apart, this is what it looked like. I use wooden stir sticks hammered in around the seam to slowly pry it apart. It worked pretty well as using hard, metal tools can just break the Ultracal sometimes and ruin the whole thing.
Luckily I was actually somewhat smart about it. Because I only had so much clay and not enough to totally fill the original silicone mould, I added in a bunch of old small silicone moulds to add some bulk - this made it easier to remove it from the mould as well since it wasn't a solid chunk of clay.
After a very long cleaning process, the mould was ready for it's first casting.
The intention is to make several cheap, light, easy to paint zombie heads. The best method I could think of was a polyfoam head with a latex skin. Since I was using latex I went with the Ultracal 30 mould - which was awesome since I already have a decent amount onhand anyway.
If you're not familiar with how Ultrcal (or really any gypsum material) and latex work together, the Ultracal actually sucks the water out of the latex, enabling you to create a thin skin. The longer you leave the latex dwelling in the mould the thicker this skin will be. I my case I need just a thin enough skin to protect the Ultracal from the polyfoam, normally you'd want enough latex to totally fill the mould to create something thicker.
I only have a little onhand so I just did a quick brush on coating to ensure it was evenly coating the deeper recesses on the front of the face, joined the halves together and sloshed around more latex, probably about 500 ml at this point. The latex was drained and I usually paint on more around the opening of the pour hole (again to prevent the expanding polyfoam from biting into the outside of the mould).
The polyfoam will normally adhere and lock into the Ultracal and it's a bugger to paint as well, hence the whole latex skin. I was using a very quick expanding and curing polyfoam (from Monster Makers) so I had to be quick about it, I made the pourhole larger than normal to make sure I could pour the foam in fast enough. It worked perfectly.
And here's the result, fresh from the mould.
I cut off the excess latex/foam from the pourhole and here's the pretty much final piece ready to be cleaned up and painted.
Normally latex can be a bugger to paint, you need to make a toxic concoction to make sure the paint adheres to the latex surface, however Monster Makers has a Latex Paint Base which works beautifully, you can even just mix it with regular acrylic paint to tint it. I've done a small amount of airbrushing with it, but need to experiment further - which I'll probably do with these since they don't have to look perfect, they are just rotting heads after all.
Also, since it has a very thin surface of latex, which keeps it really flexible and tough, and the expanding polyfoam is really low density, these heads are incredibly light and pretty squishy as well, so you can throw them at people without hurting them - if you ever feel the need to throw a severed zombie at someone.
So that's pretty much it. I can make several dozen heads from this, possibly more if I'm careful with the mould so the polyfoam doesn't ruin the moulding surface.
While only about a dozen are needed for a couple scenes in the series and this mould should last for awhile, I'm planning on making these available through the Funding Campaign for about $40, I'll only be making 10 of these for the campaign - more on that later.
Labels:
bimbo,
damned,
fund raiser,
head,
killers,
latex,
monkey,
monster makers,
moonshine,
polyfoam,
prop,
rodeo,
zombie
Wednesday, March 06, 2013
Severed Zombie Head WIP
I finally got started on some of the FX for Moonshine of the Damned, right now I'm just working on smaller stuff that I can do with the limited supplies that I already have on hand. I don't have too much, but I have enough to start working on this prop, a Severed Zombie Head.
Using a silicone mould I'd made the Uncle Jesse Corpse Head prop from the previous version of the series, I filled it with melted clay so I could start from a nearly completed sculpt instead of from scratch - just to save several hours of getting the form just right. The original head was character specific with certain wounds and marks (and a closed mouth) that would've made reproducing it for several heads a little troublesome since it would be obvious clones.
These pictures here represent about 3 or 4 hours work of sculpting - most of the was removing the lower jaw, cleaning up the obvious original wounds and fixing the nose and eye areas. Ears were added and the lower jaw re-attached after cleaning up the area inside the mouth - which will be left rough.
This is a full sized head as well. Over the weekend I'll be creating a 2 part Ultracal 30 Mould and hopefully crank out the very first copy of the head. It'll be made with a thin skin of latex, filled with expanding polyfoam. It should be nice and light and pretty durable too.
My plan is, once I get one completed and have a better idea of the work involved overall - I'll be adding these to the Funding Campaign as the 3rd phase. Not sure of the price, could be $40 with a limited number, mostly likely 10 to be made for now. If it turns out well, I will also be adding these as a regular item to the website, for sale at a somewhat higher cost - so if you're interested in a Severed Zombie Head, best to keep track of the blog to get one cheap.
Using a silicone mould I'd made the Uncle Jesse Corpse Head prop from the previous version of the series, I filled it with melted clay so I could start from a nearly completed sculpt instead of from scratch - just to save several hours of getting the form just right. The original head was character specific with certain wounds and marks (and a closed mouth) that would've made reproducing it for several heads a little troublesome since it would be obvious clones.
These pictures here represent about 3 or 4 hours work of sculpting - most of the was removing the lower jaw, cleaning up the obvious original wounds and fixing the nose and eye areas. Ears were added and the lower jaw re-attached after cleaning up the area inside the mouth - which will be left rough.
This is a full sized head as well. Over the weekend I'll be creating a 2 part Ultracal 30 Mould and hopefully crank out the very first copy of the head. It'll be made with a thin skin of latex, filled with expanding polyfoam. It should be nice and light and pretty durable too.
My plan is, once I get one completed and have a better idea of the work involved overall - I'll be adding these to the Funding Campaign as the 3rd phase. Not sure of the price, could be $40 with a limited number, mostly likely 10 to be made for now. If it turns out well, I will also be adding these as a regular item to the website, for sale at a somewhat higher cost - so if you're interested in a Severed Zombie Head, best to keep track of the blog to get one cheap.
Labels:
bimbo,
damned,
fund raiser,
head,
killers,
latex,
monkey,
moonshine,
prop,
rodeo,
severed,
undead,
web series,
zombie
Wednesday, November 21, 2012
Skullcap Prosthetics - 1st test
I finally got a chance to test my first Skullcap prosthetic. If you've never heard me mention it, I had an idea to create prosthetics for either bald people or people who like using baldcaps - it was sort of inspired by my annoyance of other prosthetics out there on the market that force you to use a baldcap (or actually be bald) but neglected to tell you in the product description.
So I figured, why not. Might be a really niche item in an already niche market - but the moulds are made and it turned out alright, so why not offer it up for sale to anyone who wants it.
Firstly, it was designed on a 21-1/2" head and the model here, John MacDonald, has a 22-1/2" head - and it went on relatively well with only the slightest little fold on one side that ultimately wasn't actually noticeable as a flaw in the end. Will it fit everyone? I highly doubt it, like all prosthetics like this they're generically made and made to fit an average size, so if you feel your skull is average sized, you might be alright. I would guess that anyone with a small head circumference might be in for a problem, although noticeably larger might be perfectly fine.
It took a whole batch of foam to make this one, so it might end up be a slightly more pricey piece along with the horns. However, because it's so thick, the edges held up really well and could be more reusable than most pieces - so it might be worth it for some folks, I guess I'll let them decide.
The design...it's alright. Hard to do something like this for the very first time when you're not sure of the potential problems and all that. It looks okay, I would never brag about it being a great design, but it works really well with the new Baalmoor piece.
I will be throwing it on the site and seeing what the response is. With the appropriate warnings of head sizes and all that. It'll be around $65 I think given how much foam is needed and the amount of resin horns. Still pretty decent price though for something with more reusable potential than most pieces.
So there you go. If you're bald and always wanted to slap a prosthetic on your skull - now you can.
So I figured, why not. Might be a really niche item in an already niche market - but the moulds are made and it turned out alright, so why not offer it up for sale to anyone who wants it.
Firstly, it was designed on a 21-1/2" head and the model here, John MacDonald, has a 22-1/2" head - and it went on relatively well with only the slightest little fold on one side that ultimately wasn't actually noticeable as a flaw in the end. Will it fit everyone? I highly doubt it, like all prosthetics like this they're generically made and made to fit an average size, so if you feel your skull is average sized, you might be alright. I would guess that anyone with a small head circumference might be in for a problem, although noticeably larger might be perfectly fine.
It took a whole batch of foam to make this one, so it might end up be a slightly more pricey piece along with the horns. However, because it's so thick, the edges held up really well and could be more reusable than most pieces - so it might be worth it for some folks, I guess I'll let them decide.
The design...it's alright. Hard to do something like this for the very first time when you're not sure of the potential problems and all that. It looks okay, I would never brag about it being a great design, but it works really well with the new Baalmoor piece.
I will be throwing it on the site and seeing what the response is. With the appropriate warnings of head sizes and all that. It'll be around $65 I think given how much foam is needed and the amount of resin horns. Still pretty decent price though for something with more reusable potential than most pieces.
So there you go. If you're bald and always wanted to slap a prosthetic on your skull - now you can.
Labels:
demons,
foam,
head,
latex,
latex mask,
makeup,
masks,
mold,
monkey,
mould,
prosthetic,
rodeo,
skull,
skull cap
Thursday, November 01, 2012
Post Halloween Syndrome
For me Halloween is pretty much year round, so it's not so much all that special in the sense of I can finally see people in costume and all done up looking freaky - I see that all the time. And it's not so much a relaxing time of year as I'm busy getting everyone else ready and usually don't really feel like doing that much myself. Although, without Halloween I wouldn't be making as much money, so for that reason, it is indeed awesome. And it's finally over.
This year was a little quieter than last, for a number of reasons. Although I did a higher amount of retail business, which I was rather happy about. Still having trouble really breaking into the wholesale market. I have a couple clients, but I'd really like 2-3 more. I think it would push things over the edge into making the business much more viable in the long run. So I'm starting early to get that process moving forward rather than waiting until next spring.
One of the things I'm doing this year, and I've mentioned this before, is introducing a couple new prosthetic lines. The main one being female oriented prosthetics, since around 95% of my retail business was from women and I've been told by a wholesale client that it's definitely an unfilled niche in the market - I'm thinking it might not be so niche.
I've got my main positive mould done and I'm about to start testing them to see if they'll fit women better than my current pieces - which I'm well aware won't fit them well. These ones are a little shorter in length from forehead to chin, so I'm hoping it'll work. I'm about to line up the first of a few shoots with some new designs over the next few weeks.
Here's the first sculpt, it's already been moulded and I'm doing a silicone master right now. No name for it yet, I'll decide on one once I see it applied as a character I think. Overall I'm happy with the design, I'm trying to make these ones less monstrous and simply more "obviously not human" looking. This particular one will have some chin spikes as usual, I seem to like doing that.
We'll see soon enough if it all works out. And I hope to be trying out the SkullCap Prosthetics soon as well.
I did a few makeup jobs last year and I think one or two even the year before that, but this year was a bit of a bust. I had a lot lined up and pretty much all, but one, flaked out on me and just never showed up. One cancelled, I'm fine with that, but just not showing up I found a little rude. Their loss.
Anyway, the one I did end up doing turned out awesome. I even kinda impressed myself with it. My first time relying totally on my airbrush for all the makeup. Not one bit of grease or creme makeup was used. You can't really see the details in the picture, but overall it was blended pretty well and looked decently freaky. I used the Borom Demon piece and just did a fleshy colouring with it, some spots and reddish colouring as well, it wasn't too crazy. We went for a more, I guess you could call it realistic look. And he bought a Shrunken Demon Head to fill out the look.
It's been years since I've seen the movie, but this piece unintentionally reminds me of Rawhead Rex.
I'm not cranking out piles of prosthetics a day for the moment, so I can take a bit of a rest and start working on redesigning some older pieces that were never master moulded and creating some new ones. And even working on a few more Demonic Antiquities pieces, first on that list is a Mummy Hand. We'll see how that goes.
This year was a little quieter than last, for a number of reasons. Although I did a higher amount of retail business, which I was rather happy about. Still having trouble really breaking into the wholesale market. I have a couple clients, but I'd really like 2-3 more. I think it would push things over the edge into making the business much more viable in the long run. So I'm starting early to get that process moving forward rather than waiting until next spring.
One of the things I'm doing this year, and I've mentioned this before, is introducing a couple new prosthetic lines. The main one being female oriented prosthetics, since around 95% of my retail business was from women and I've been told by a wholesale client that it's definitely an unfilled niche in the market - I'm thinking it might not be so niche.
I've got my main positive mould done and I'm about to start testing them to see if they'll fit women better than my current pieces - which I'm well aware won't fit them well. These ones are a little shorter in length from forehead to chin, so I'm hoping it'll work. I'm about to line up the first of a few shoots with some new designs over the next few weeks.
Here's the first sculpt, it's already been moulded and I'm doing a silicone master right now. No name for it yet, I'll decide on one once I see it applied as a character I think. Overall I'm happy with the design, I'm trying to make these ones less monstrous and simply more "obviously not human" looking. This particular one will have some chin spikes as usual, I seem to like doing that.
We'll see soon enough if it all works out. And I hope to be trying out the SkullCap Prosthetics soon as well.
I did a few makeup jobs last year and I think one or two even the year before that, but this year was a bit of a bust. I had a lot lined up and pretty much all, but one, flaked out on me and just never showed up. One cancelled, I'm fine with that, but just not showing up I found a little rude. Their loss.
Anyway, the one I did end up doing turned out awesome. I even kinda impressed myself with it. My first time relying totally on my airbrush for all the makeup. Not one bit of grease or creme makeup was used. You can't really see the details in the picture, but overall it was blended pretty well and looked decently freaky. I used the Borom Demon piece and just did a fleshy colouring with it, some spots and reddish colouring as well, it wasn't too crazy. We went for a more, I guess you could call it realistic look. And he bought a Shrunken Demon Head to fill out the look.
It's been years since I've seen the movie, but this piece unintentionally reminds me of Rawhead Rex.
I'm not cranking out piles of prosthetics a day for the moment, so I can take a bit of a rest and start working on redesigning some older pieces that were never master moulded and creating some new ones. And even working on a few more Demonic Antiquities pieces, first on that list is a Mummy Hand. We'll see how that goes.
Labels:
beast,
borom,
business,
creepy stuff,
demons,
head,
latex,
latex mask,
makeup,
mold,
monkey,
mould,
prosthetic,
rodeo,
shrunken
Subscribe to:
Posts (Atom)