I came up with the idea for making wall mounted beast heads years ago, of course I never got around to it and since then I've seen several others making them - that's always annoying. However, I finally got around to it, it was mostly the finer details of reproducing them consistently that stopped me from doing it right away.
The biggest stumbling block for me ended up being two relatively simple things, the plaque itself and the eyes.The biggest problem was sourcing locally and then sourcing within Canada online. Neither really panned out in a way I felt would work for me without driving the cost of the final piece up. Then I suddenly happened upon some small plaques that were very inexpensive and it went from there.
As for the eyes, I didn't want to paint them, so I wanted something I could just plop into place. I found some glass black glass beads that would give the troll that soulless look. The tricky part was designing all this to be done with just a single mould with a minimum amount of work involved to reproduce the piece.
So I took one of the stones, glued a wooden stick to it. Because that how you make eyeballs, right?
I made a mould of that and created to silicone copies.
So I could sculpt around them to create a socket and pull them out without distressing the sculpture.
It worked perfectly. It took less than a day for the sculpt. I pretty much just made it up as I was going. I knew I wanted a fat little weird troll-like head and that was it.
I was happy with the result, and that it didn't take me days of agonizing over details to get it to turn out. From there I made a stone mould, with a flat back to it, drilled a hole in that and the mould was done in less than a day as well.
I thought the best and least expensive material would be latex filled with expanding foam, I'm used to it and I had all these supplies onhand already, so that was a pretty easy choice.
And there you have it. I had minimal cleanup around the edges, no other post-mould adjusting, cleaning or detailing to do, I just had to paint it, glue in the eyes and stain the plaque and mount the sucker. It was a lot more work than I'm making it sound, but it's fairly easy work overall, just takes a couple hours to produce one of these - unless I do them in bulk.
So yes, I am selling these. At the time of posting this I've just made the first prototype one, I'll be running off a couple more and doing a run of 5 for now and seeing how well they sell. Now that I've done the whole process and know my costs, I came up with a price of $40 for each one. Anyone interested can contact me, themonkeyrodeo@gmail.com.
So, after all that, what is a Pygmy Blood Troll? Here's some information on this ugly little critter.
The origins of this vile species is rather complicated.
While most all creatures of Demonic origins are peaceful, docile beings, Pygmy
Blood Trolls are quite the opposite.
It begins with the Blood Parasite, a leech-like worm that is
responsible for most modern Vampire myths. They infect a living host, leaving
them mostly dead in all appearances, using their bodies to then feed on blood
from living victims. Normally this process simply works with the parasite
taking over the internal functions of both Demons and Humans, Humans being much
more susceptible because of their weaker physiology.
Demons are more resistant to the Blood Parasite on average,
27% of all Demonic species are completely immune to them. Trolls specifically
are immune to Blood Parasite, however one species, Earth Trolls – who can
hibernate deep in the earth for hundreds of years – actually absorb the Blood
Parasite.
In most cases the parasite is simply consumed internally
with no ill effect, however in pregnant Earth Trolls, the fetus is bonded with
the parasite, altering its entire biological structure. One Pygmy Blood Troll
(called as such since they never grow over a foot tall and most trolls range
from seven feet to several hundred feet tall) is a somewhat hazardous nuisance,
several are a much different matter. Pygmy Blood Trolls procreate much like
modern day rabbits, within months there can be as many as one thousand.
Pygmy Blood Trolls usually feed on smaller
animals, but have, on occasion, attacked larger creatures in packs. They are
incredibly dangerous in high numbers since their Trolls physiology makes them
strong for their size, and very tough to kill. The Blood Parasite physiology
makes them very fast healers and immune to pain – it’s is believe the only true
method of killing a Pygmy Blood Troll is to decapitate it and burn the body
immediately. They will also, like their parentage, burrow deep into the earth
where they can hibernate for hundreds of years and are near impossible to find
in this state – this makes controlling Pygmy Blood Troll outbreaks a very
difficult task and on that must be handled immediately before they either
procreate or enter hibernation.
Showing posts with label foam. Show all posts
Friday, December 19, 2014
Sunday, November 30, 2014
What Happens to Old Prosthetic Makeup?
I've had these lurking around my workshop for some time and thought it'd be interesting to see a side by side comparison of a prosthetic stored properly and one stored very improperly.
The white-ish one was obviously stored properly, the one that looks like overbaked bread was not. These were both made around the same time, give or take a couple weeks, approximately 3 and a half years ago.
The one on the left is still totally usable, the foam is slightly stiffer (but then again it could have come out like that in the beginning, I don't recall) but otherwise totally useable - in fact I'm planning on using it tomorrow perhaps. It was stored in a sealed bag away from direct light.
The one on the right was left in the back seat window of a car, during the summer, for maybe 7 months or so and has just been left out ever since. It's incredibly delicate, in fact a few tiny pieces crumbled away just picking it up to do this shot. It's totally stiff, the underside (not in the sun) is a yellow-ish colour and you can see the topside is that golden brown (slightly burned) bread crust colour - although totally rigid and a little shiny.
This is a good demonstration to customers who by prosthetics who wonder why things need to be stored properly and how long they can last. In a sealed bag (everything prosthetic piece I sell comes in a zip lock bag anyway) out of direct sunlight - and definitely not in the back window of a car for several month during the summer.
As I said, it's been about 3 and a half years and the piece is still totally useable. You hear some people go on about how foam latex (and latex in general) will degrade over time, it will, but it will take a LONG time, so there should never be any concern about buying a prosthetic piece like this and no using it right away - just store it properly and you can still use it years later.
The white-ish one was obviously stored properly, the one that looks like overbaked bread was not. These were both made around the same time, give or take a couple weeks, approximately 3 and a half years ago.
The one on the left is still totally usable, the foam is slightly stiffer (but then again it could have come out like that in the beginning, I don't recall) but otherwise totally useable - in fact I'm planning on using it tomorrow perhaps. It was stored in a sealed bag away from direct light.
The one on the right was left in the back seat window of a car, during the summer, for maybe 7 months or so and has just been left out ever since. It's incredibly delicate, in fact a few tiny pieces crumbled away just picking it up to do this shot. It's totally stiff, the underside (not in the sun) is a yellow-ish colour and you can see the topside is that golden brown (slightly burned) bread crust colour - although totally rigid and a little shiny.
This is a good demonstration to customers who by prosthetics who wonder why things need to be stored properly and how long they can last. In a sealed bag (everything prosthetic piece I sell comes in a zip lock bag anyway) out of direct sunlight - and definitely not in the back window of a car for several month during the summer.
As I said, it's been about 3 and a half years and the piece is still totally useable. You hear some people go on about how foam latex (and latex in general) will degrade over time, it will, but it will take a LONG time, so there should never be any concern about buying a prosthetic piece like this and no using it right away - just store it properly and you can still use it years later.
Friday, October 18, 2013
Limited Edition Mummy Hand Prop
I've finally got the Mummy Hand all ready for proper sale. I have 2 versions. There's the "Standalone" piece, that's just the hand itself for $30 (limited to 20) and the "Museum Piece" version for $70 (limited to 10).
The "Museum Piece" includes a stained box with plexiglass lid (so no worried about it breaking in shipping), it's hand stained and lined with Spanish Moss and includes a label on the front of the box indicating the number of the piece out of 10.
The "Standalone" version is just the hand itself, wrapped with gauze and comes with a card indicating the number of the piece out of 20. The hand itself is a latex skinned polyfoam that's hand painted.
A properly coloured picture to show what the hand really looks like, as well as the staining on the box.
I make these to order, so give about 1 week for manufacturing.
If you're interested, you can contact me at: foxhenderson @ themonkeyrodeo.com. Payment can be made through Paypal, or Email Interact if you're in Canada. Right now I've no idea of shipping costs, but I'd estimate around $30-$40 in the US, possibly $20-$30 in Canada for standard delivery. And at least $30 for overseas - at the lowest rate, 4-6 weeks as well.
The "Museum Piece" includes a stained box with plexiglass lid (so no worried about it breaking in shipping), it's hand stained and lined with Spanish Moss and includes a label on the front of the box indicating the number of the piece out of 10.
The "Standalone" version is just the hand itself, wrapped with gauze and comes with a card indicating the number of the piece out of 20. The hand itself is a latex skinned polyfoam that's hand painted.
A properly coloured picture to show what the hand really looks like, as well as the staining on the box.
I make these to order, so give about 1 week for manufacturing.
If you're interested, you can contact me at: foxhenderson @ themonkeyrodeo.com. Payment can be made through Paypal, or Email Interact if you're in Canada. Right now I've no idea of shipping costs, but I'd estimate around $30-$40 in the US, possibly $20-$30 in Canada for standard delivery. And at least $30 for overseas - at the lowest rate, 4-6 weeks as well.
Monday, June 03, 2013
Moonshine of the Damned, Production Journal #6
First day of shooting was postponed. Not off to a great start, but I'm no so much worried about shooting this year, I think it'll be fine if we're all a little patient. There's only 10 days needed. If we can't find 10 days over the course of the summer, than something is horribly wrong.
Lots of pictures this time around, so let's get to it.
First up, the sculpt of the leg bone prop. I was thinking, since I have a medical skeleton leg bone, that I would just do a quick alginate mould and fill it with clay to get this, but that was just a lot of wasted time and material. As well, a real femur has too much of a curve to it to accommodate the support rod, so I quickly whipped this bad boy up.
I've said before how much I really don't like doing 2 part moulds, creating that dividing wall is just so tedious and normally difficult to get just right. Have made so many of them lately though, I realized while I was doing this one that I really felt like I was finally getting the hang of it. Turned out great.
Started sculpting a couple of the custom "hero zombie" pieces needed for the movie. I wanted to make sure this time around that the FX were was detailed as I could make them. And that meant creating a single unique piece for each of the "hero zombies". This here is for the "Half Zombie" and while you can't tell here, this is our homage to the "Bicycle Girl" from The Walking Dead. It was a really quick sculpt, about half an hour.
"Piss Zombie". One of the few things to survive from the original draft, but this time he's getting a little special treatment to mess him up a little more. The actor has a beard so I wanted to make sure since I only had so much room to do a piece, that it would be very dramatic. I like it.
All the zombie pieces I'm making for the movie are just short run moulds, and since I'll only be needed one good piece from them, I will be creating as many as possible until the moulds give out and added them as a limited run for sale on the website. I'll be adding as them as they're used in the movie to have a good applied shot of them.
Return of the Zombie Frog. While I was more or less happy with how the original turned out, he was made of silicone which I find difficult to paint dramatically. Since he's only onscreen for a couple seconds I really wanted to make sure it was obvious and really stood out, so I remade him, exaggerated the silhouette a little more and he'll be made of latex. He looks very chocolatey here, I'm thinking maybe Chocolate Zombie Frogs in the future?
The finished leg bone. Latex skinned and polyfoam filled with a support rod - as usual. It turned out awesome. Really happy with this piece and how simple yet how great of a prop it is. I've been meaning to make on for over a year now and give how simple it was I'm not sure what I was waiting for.
For those interested. This will be added for sale to the website very soon, once I get this one painted and get some good pictures. They'll be $30. Feel free to get in touch now if you want to pre-order one.
Note: it's not medically accurate, if you'll recall the bit I was mentioning on the sculpt version of this piece up above. It does look pretty decent though.
The Spiked Zombie Head Mace - still really happy with this prop, can't wait to see it on screen.
A quick detail shot of the staff. The head is so distracting you don't really notice just how much work I put into the staff and how well the paint job came out.
So that's it for pictures. I've got a few more things on the go this week to prep for the coming shoots this weekend - if the weather and schedules hold out for us. It'll be nice to get back into it finally.
Lots of pictures this time around, so let's get to it.
First up, the sculpt of the leg bone prop. I was thinking, since I have a medical skeleton leg bone, that I would just do a quick alginate mould and fill it with clay to get this, but that was just a lot of wasted time and material. As well, a real femur has too much of a curve to it to accommodate the support rod, so I quickly whipped this bad boy up.
I've said before how much I really don't like doing 2 part moulds, creating that dividing wall is just so tedious and normally difficult to get just right. Have made so many of them lately though, I realized while I was doing this one that I really felt like I was finally getting the hang of it. Turned out great.
Started sculpting a couple of the custom "hero zombie" pieces needed for the movie. I wanted to make sure this time around that the FX were was detailed as I could make them. And that meant creating a single unique piece for each of the "hero zombies". This here is for the "Half Zombie" and while you can't tell here, this is our homage to the "Bicycle Girl" from The Walking Dead. It was a really quick sculpt, about half an hour.
"Piss Zombie". One of the few things to survive from the original draft, but this time he's getting a little special treatment to mess him up a little more. The actor has a beard so I wanted to make sure since I only had so much room to do a piece, that it would be very dramatic. I like it.
All the zombie pieces I'm making for the movie are just short run moulds, and since I'll only be needed one good piece from them, I will be creating as many as possible until the moulds give out and added them as a limited run for sale on the website. I'll be adding as them as they're used in the movie to have a good applied shot of them.
Return of the Zombie Frog. While I was more or less happy with how the original turned out, he was made of silicone which I find difficult to paint dramatically. Since he's only onscreen for a couple seconds I really wanted to make sure it was obvious and really stood out, so I remade him, exaggerated the silhouette a little more and he'll be made of latex. He looks very chocolatey here, I'm thinking maybe Chocolate Zombie Frogs in the future?
The finished leg bone. Latex skinned and polyfoam filled with a support rod - as usual. It turned out awesome. Really happy with this piece and how simple yet how great of a prop it is. I've been meaning to make on for over a year now and give how simple it was I'm not sure what I was waiting for.
For those interested. This will be added for sale to the website very soon, once I get this one painted and get some good pictures. They'll be $30. Feel free to get in touch now if you want to pre-order one.
Note: it's not medically accurate, if you'll recall the bit I was mentioning on the sculpt version of this piece up above. It does look pretty decent though.
The Spiked Zombie Head Mace - still really happy with this prop, can't wait to see it on screen.
A quick detail shot of the staff. The head is so distracting you don't really notice just how much work I put into the staff and how well the paint job came out.
So that's it for pictures. I've got a few more things on the go this week to prep for the coming shoots this weekend - if the weather and schedules hold out for us. It'll be nice to get back into it finally.
Labels:
alginate,
bone,
femur,
foam,
foam latex,
frog,
head,
latex,
mace,
polyfoam,
props,
prosthetic,
sculpture,
spiked,
zombie
Thursday, May 02, 2013
Moonshine of the Damned, Production Journal #4
Lots of pictures this time around.
Things are progressing well on Moonshine of the Damned, we start shooting in a month, June 1st is the first shooting day - well, evening actually. There's been yet another massive round of changes, I think even from the last update. I've settled on a final incarnation of the script, one that had to incorporate certain difficult scheduling issues. All those issues have pretty much been resolved and now I've got a finished script, 37 pages down from 71.
Scheduling will start this week - that'll be fun. I've already got a rough schedule worked out, now it's just time to see what else goes wrong and if another rewrite or recasting session has to happen. It's been a troublesome project already, but I always feel like if pre-production is difficult than the shoot usually goes well. Something always has to go wrong and I'd rather it happen now when it's fixable than when it's too late and we're halfway through shooting.
Location scouting, while partially done, will start soon as well. I'm trying to simplify our locations so we're not running all over the Island. Luckily we don't need anything too crazy, we're just shooting in wooded locales and those a pretty plentiful around here.
So the biggest thing left to tackle are the special effects. While the fundraiser is still going for another couple weeks, I've managed to really narrow down the FX needs of the project without sacrificing my overall goal for them. Some single use pieces have been altered and for convenience (and safety) some will be CG - I wanted to stay away from CG as much as possible, but time and money was a concerned. A $100+ prop for a single shot use didn't seem reasonable.
The first big round of supplies cam in this morning from Sculpture Supply. Some various stuff from Smooth-On and Monster Makers - they pretty much make everything I use on a regular basis, I highly recommend their stuff, I've been using it for years now with very few problems or issues.
The Zombie Gator. I've been looking forward to this prop for so long now. It's the biggest thing I've every sculpted and attempted for something like this. It won't be ultra-realistic looking by any means, but that's not what I'm going for. I like my movies with a healthy side order of cheese, coated with melted cheese on a plate made of cheese...I think you get the point.
This here is the upside-down mould, secured together while the latex skin cures in the sun. Normally you'd use latex in an UltraCal 30 mould, however my intention was to originally do this as a urethane skinned prop - I've since made a lot of discoveries through experimenting and found latex was a much more reasonable solution. It's a little more work, but that's not an issue for me.
The latex should be pretty much cured by now, I'm writing this while it's sitting outside right now. I spent yesterday painting several layers on each mould part, assembled the mould and painted another layer of latex along the seams to make sure it's all one decently solid skin before I dump in the expanding foam. I'm really hoping I can get to this today.
A hand. Pretty simple. This was made from an alginate mould from my girlfriend Kim's hand. It'll be used as a stunt hand in the opening sequence, but I've since written a shot or two requiring some random body parts. If time and money permits, I may do couple more body parts.
Foam weapons. Same stuff as last year, I've just updated the method by which I'm finishing them. I have to make a new axe set since I sent the others off to another actor for him to do his shots. There'll be another sledgehammer made for a specific gory FX shot I'm looking forward to.
Here's a closeup of the sledgehammer head. I'm really happy with how it turned out. Last years sledgehammer was given a silver coating, I realized that was just a poor move as I wanted it to look old and used, this will just be given a quick fake rust treatment and it'll be all good to go for whacking zombies.
Finally, I thought I'd show off a couple more shots of this bad boy. I've still got a long way to go in understanding silicone masks. This one here had some really thin spots I tried to patch up as best as possible, but unfortunately this type of silicone, Eco-Flex 20, doesn't adhere to itself very well so patching and seaming was near impossible. Not that it really matters, it's just being used as a background zombie now and does make a decent prop to just have sitting around the workshop. Overall it was a good learning experience in sculpting, moulding and painting.
Up next on the FX list is to start the moulds for the few body parts I have planned and to get into sculpting the new round of zombie prosthetics I'll be making. There'll be a lot more unique, single use makeups this year, I don't want the zombies to look lazy and sloppy, that's not the point of why I'm doing this. I'm doing this to really showcase some of my FX abilities so nothing will be half-assed. The schedule has taken all this into account so I won't feel rushed to get zombie groups done in order to get things done quicker.
That's it for now, it's already been a busy morning getting things worked out and settled and now I need to take a quick break before getting back at it again.
Things are progressing well on Moonshine of the Damned, we start shooting in a month, June 1st is the first shooting day - well, evening actually. There's been yet another massive round of changes, I think even from the last update. I've settled on a final incarnation of the script, one that had to incorporate certain difficult scheduling issues. All those issues have pretty much been resolved and now I've got a finished script, 37 pages down from 71.
Scheduling will start this week - that'll be fun. I've already got a rough schedule worked out, now it's just time to see what else goes wrong and if another rewrite or recasting session has to happen. It's been a troublesome project already, but I always feel like if pre-production is difficult than the shoot usually goes well. Something always has to go wrong and I'd rather it happen now when it's fixable than when it's too late and we're halfway through shooting.
Location scouting, while partially done, will start soon as well. I'm trying to simplify our locations so we're not running all over the Island. Luckily we don't need anything too crazy, we're just shooting in wooded locales and those a pretty plentiful around here.
So the biggest thing left to tackle are the special effects. While the fundraiser is still going for another couple weeks, I've managed to really narrow down the FX needs of the project without sacrificing my overall goal for them. Some single use pieces have been altered and for convenience (and safety) some will be CG - I wanted to stay away from CG as much as possible, but time and money was a concerned. A $100+ prop for a single shot use didn't seem reasonable.
The first big round of supplies cam in this morning from Sculpture Supply. Some various stuff from Smooth-On and Monster Makers - they pretty much make everything I use on a regular basis, I highly recommend their stuff, I've been using it for years now with very few problems or issues.
The Zombie Gator. I've been looking forward to this prop for so long now. It's the biggest thing I've every sculpted and attempted for something like this. It won't be ultra-realistic looking by any means, but that's not what I'm going for. I like my movies with a healthy side order of cheese, coated with melted cheese on a plate made of cheese...I think you get the point.
This here is the upside-down mould, secured together while the latex skin cures in the sun. Normally you'd use latex in an UltraCal 30 mould, however my intention was to originally do this as a urethane skinned prop - I've since made a lot of discoveries through experimenting and found latex was a much more reasonable solution. It's a little more work, but that's not an issue for me.
The latex should be pretty much cured by now, I'm writing this while it's sitting outside right now. I spent yesterday painting several layers on each mould part, assembled the mould and painted another layer of latex along the seams to make sure it's all one decently solid skin before I dump in the expanding foam. I'm really hoping I can get to this today.
A hand. Pretty simple. This was made from an alginate mould from my girlfriend Kim's hand. It'll be used as a stunt hand in the opening sequence, but I've since written a shot or two requiring some random body parts. If time and money permits, I may do couple more body parts.
Foam weapons. Same stuff as last year, I've just updated the method by which I'm finishing them. I have to make a new axe set since I sent the others off to another actor for him to do his shots. There'll be another sledgehammer made for a specific gory FX shot I'm looking forward to.
Here's a closeup of the sledgehammer head. I'm really happy with how it turned out. Last years sledgehammer was given a silver coating, I realized that was just a poor move as I wanted it to look old and used, this will just be given a quick fake rust treatment and it'll be all good to go for whacking zombies.
Finally, I thought I'd show off a couple more shots of this bad boy. I've still got a long way to go in understanding silicone masks. This one here had some really thin spots I tried to patch up as best as possible, but unfortunately this type of silicone, Eco-Flex 20, doesn't adhere to itself very well so patching and seaming was near impossible. Not that it really matters, it's just being used as a background zombie now and does make a decent prop to just have sitting around the workshop. Overall it was a good learning experience in sculpting, moulding and painting.
Up next on the FX list is to start the moulds for the few body parts I have planned and to get into sculpting the new round of zombie prosthetics I'll be making. There'll be a lot more unique, single use makeups this year, I don't want the zombies to look lazy and sloppy, that's not the point of why I'm doing this. I'm doing this to really showcase some of my FX abilities so nothing will be half-assed. The schedule has taken all this into account so I won't feel rushed to get zombie groups done in order to get things done quicker.
That's it for now, it's already been a busy morning getting things worked out and settled and now I need to take a quick break before getting back at it again.
Labels:
bimbo,
damned,
foam,
fund raiser,
killers,
latex,
mask,
monkey,
monster makers,
moonshine,
rodeo,
silicone,
Smooth-On,
special effects,
undead,
weapons,
zombie
Tuesday, April 09, 2013
Win a Spiked Zombie Head Mace!
I've been mentioning that as part of the Moonshine of the Damned Fundraiser that everyone who helps out gets a chance to win some zombie stuff. Well, I've finally settled on at least one of three possible prizes I'm planning on offering up.
The Spiked Zombie Head Mace is the first prop up for grabs. A limited edition version will be going online for sale later this summer for $150 (this could change slightly), so if you're like it, you got a chance to win this for only $10. Seems like a pretty reasonable trade.
The final prop will be made of polyfoam with a latex skin, it's pretty tough and durable under reasonable use - I wouldn't recommend repeatedly bashing a cactus covered with sandpaper and broken glass though. It'll have a carbon fiber rod in its core to give it some stability. The colouring will differ as well - but that can actually be your choice, as well as the number and even placement of the spikes jammed into the head.
How do you win it exactly? Well, if you hadn't noticed, I'm running a fund raising for a web series I'm doing. Head to www.themonkeyrodeo.com/BZK3 and it'll outline the various ways you can help out and later in the spring I'll be doing a draw to see who wins what stuff.
Some of the other possible prizes will be a bag of Severed Zombie Heads and a foam sledge hammer and hatchet combo or even a collection of body parts. I'll be making a final decision as the props are made and decide what would be most interesting.
If you're interested, you can also email me at brains@themonkeyrodeo.com for more information as well.
The Spiked Zombie Head Mace is the first prop up for grabs. A limited edition version will be going online for sale later this summer for $150 (this could change slightly), so if you're like it, you got a chance to win this for only $10. Seems like a pretty reasonable trade.
The final prop will be made of polyfoam with a latex skin, it's pretty tough and durable under reasonable use - I wouldn't recommend repeatedly bashing a cactus covered with sandpaper and broken glass though. It'll have a carbon fiber rod in its core to give it some stability. The colouring will differ as well - but that can actually be your choice, as well as the number and even placement of the spikes jammed into the head.
How do you win it exactly? Well, if you hadn't noticed, I'm running a fund raising for a web series I'm doing. Head to www.themonkeyrodeo.com/BZK3 and it'll outline the various ways you can help out and later in the spring I'll be doing a draw to see who wins what stuff.
Some of the other possible prizes will be a bag of Severed Zombie Heads and a foam sledge hammer and hatchet combo or even a collection of body parts. I'll be making a final decision as the props are made and decide what would be most interesting.
If you're interested, you can also email me at brains@themonkeyrodeo.com for more information as well.
Friday, April 05, 2013
Making a fake rock
Without a doubt the most boring prop I’ve ever made I think – at as far as descriptions go. There’s a short sequence in Moonshine of the Damned requiring some violence and a rock, so for safety’s sake we’re going fake
It was a pretty simple prop to make as well, finding the
perfect rock was just as simple. It was in a pile by the car during a shoot
last summer – so it wasn’t like I even had to hunt for one.
First thing I did was give it a bit of a cleaning. Most all
of our rocks here are sandstone, not the easiest to clean – luckily this bad boy was
granite – at least I think it’s granite, I’m not a geologist. Once it was all
cleaned up I made a two part silicone mould – you’ll have to imagine that part,
I didn’t take pictures because I didn’t think it’d be that interesting…and it
might not be.
Once the mould was done I actually abandoned the prop once
the web series was cancelled and only began thinking about it just recently. I
had been making some other simple props and thought it was time to crank this
out. It also helped that I finally had a handle on painting it.
It was easy enough to cast, but one thing to note about using Flex FoamIt, that I only found out last summer - I don't know how widespread this information is, but I didn't know this - the material, once cured, can sort of shrivel into itself, this can easily be fixed by crushing the piece, squeezing out supposed gases that cause the shriveling effect. So far it's worked well for me nearly 100% of the time.
So, here’s some pictures:
The mould, made of silicone with a support shell.
I bolted it together, seemed the simplest thing to do.
The original rock (left) and the unpainted soft foam rock (right).
The fake rock - the detailing is what helps it, even this doesn't look too bad.
The original and the final fake rock. Didn't come out too bad.
And here it is, in all it's artifical geological glory. The Fake Rock.
So there you go, a fake rock. It's only needed in a very short sequence, but it's one of those thing that you might write in a script and not really think about how you'll accomplish it, let alone accomplish it safely. This is something I couldn't have done a couple years ago and now it's a completely simple process to create a tiny bit of movie magic.
Chances are when you see the scene it's in, you won't really think "How'd they do that?" Most people will just assume it was a trick camera angle, or some folks who don't really understand FX might even think it's CG - nope, it's a chunk of soft foam. It can be throw right at a person's head if needed and it'll be relatively safe - at least moreso than lobbing a real rock.
Technical Info: The whole thing was done using Smooth-On products. The mould was Rebound 25 with a Plasti-Paste II shell. The rock itself is made from Flex FoamIt V and painted using Monster Makers Latex Paint Base tinted with acrylic paints.
This isn't something I'll ever put on the website for sale, but if you've stumbled upon this and think it'd be a whole lot easier (since the mould is already made) to just buy one instead of making one yourself, feel free to send me an email. I reckon I'd sell it for about $25 - it's a bugger to paint decently and does take awhile. Email: foxhenderson@themonkeyrodeo.com.
Note about cost: Just an FYI concerning the cost of making one of these. It's not too bad, but even using the minimum quantities available of the products, you're looking at over $100.
Labels:
fake,
Flex Foam It V,
foam,
how to make,
monkey,
mould,
Plasti-Paste,
polyfoam,
prop,
Rebound 25,
rock,
rodeo,
silicone,
Smooth-On,
stone
Friday, February 22, 2013
Demon Photo Services
While I'm continuing to do my own shoots, I am no longer really looking for new models - but that doesn't mean you still can't get demonized as I'm planning on offering up a Demon Photoshoot Service. Here's the details:
If you’re not a resident of PEI and you don’t live here, well that’s a problem. However, should you plan to be on the Island at a certain time and are interested, let me know – but 2 weeks notice minimum would be appreciated as I am busy and this is not a last minute thing.
Since every shoot will be, most likely, totally different,
it’s hard to pin down all the finer details – such as locations, travel,
costumes and whatever. I can say, I don’t have a car so travel is up to you. I
don’t have a stock of costumes, so if you wanted something special or specific,
you’d have to supply that yourself unless it’s so special (and you’re willing
to pay extra) I’d have to make it. As for locations, anywhere you’re willing to
drive to is fine by me.
Cost Breakdown:
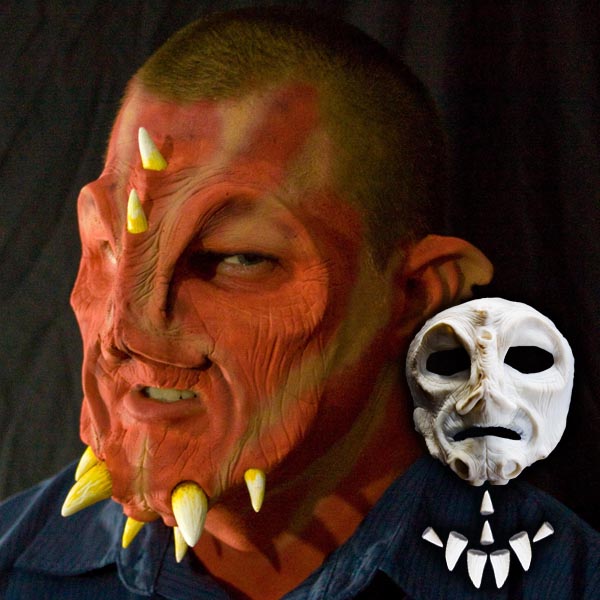
For example, this here picture, should someone wish to
recreate this, would be expensive – and that’s not even thinking of the
costume, which was mostly custom made for this shoot. The makeup was a full
face piece ($50), a pair of ears ($20) and 4 pairs of horns($40), plus
application ($20) would run $130, plus $20 for the shoot itself – you’d be
looking at $150 for that kind of photo shoot.
Another example
Forehead ($20) – and for this shoot I did make some custom
fangs and had a pair of contacts leftover from another shoot with the same
model. This would run you $40.
However, if you wanted fangs, custom made ones are pretty
pricey and a bit of a pain to do a right now (working on that however), my
suggestion would be to find yourself some cheap Halloween ones for yourself. I
think Repeats in Charlottetown actually has some all year round, but I could be
wrong.
Some other important stuff to know:
The more people, the more time it'll all take and the more it'll cost - there's no discount for multiple people since it's way more work time for me. Also, multiple people at night can be tricky since it's harder to focus on multiple subjects unless there's good light.
Children...Nope. I DO NOT recommend this for children because there's a lot of things that can go wrong and some adults even have issues with it. I am not interested in dealing with these issues nor is a simple explanation enough to waive this - unless you yourself have gone through it and totally understand the entire process and are willing to convey that to your child and are willing to accept the consequences should there be a reaction to the makeup or something in the whole process, I refuse to do a shoot with anyone of age 12 - and there's no wiggle room on this, and they must be accompanied by a parent. Also, most of the larger pieces I have will most likely not fit children anyway.
Sometimes, in certain conditions - like nighttime - pictures can not to turn out very well, no problem there at all. Should you want to do a night shoot and the bulk of the pictures just turn out blurry and out of focus, I've no problem redoing the shoot at no extra cost. However, the makeup must be identical to the previous shoot.
I'm sure there's a lot more things that could be covered, but there's just too many variables - so feel free to send me an email foxhenderson@themonkeyrodeo.com, and asked away. Can't hurt.
Some other important stuff to know:
The more people, the more time it'll all take and the more it'll cost - there's no discount for multiple people since it's way more work time for me. Also, multiple people at night can be tricky since it's harder to focus on multiple subjects unless there's good light.
Children...Nope. I DO NOT recommend this for children because there's a lot of things that can go wrong and some adults even have issues with it. I am not interested in dealing with these issues nor is a simple explanation enough to waive this - unless you yourself have gone through it and totally understand the entire process and are willing to convey that to your child and are willing to accept the consequences should there be a reaction to the makeup or something in the whole process, I refuse to do a shoot with anyone of age 12 - and there's no wiggle room on this, and they must be accompanied by a parent. Also, most of the larger pieces I have will most likely not fit children anyway.
Sometimes, in certain conditions - like nighttime - pictures can not to turn out very well, no problem there at all. Should you want to do a night shoot and the bulk of the pictures just turn out blurry and out of focus, I've no problem redoing the shoot at no extra cost. However, the makeup must be identical to the previous shoot.
I'm sure there's a lot more things that could be covered, but there's just too many variables - so feel free to send me an email foxhenderson@themonkeyrodeo.com, and asked away. Can't hurt.
Tuesday, January 29, 2013
"Thing in a Jar", the Complete Collection
With the completion of the 5th and final "thing", an Albino Bilifore Parasite, I'm offering up the "Thing in a Jar" props as a whole collection.
Here's the ugly little sucker before being sealed up in his jar. It's made from 2 layers of silicone, with small beads of Premo embedded between them for eyes. A layer of laxet that's been torn and distressed finishes it off. The silicone is untinted for a semi-translucent look, the image below was taking during sunrise and gives it a sort of delicate deep fried look, it doesn't normally look like that.
Here he is all snug in his jar of simulated Giant Mountain Troll bile to keep him fresh.
Using silicone to make this and adding on 6 thin tendrils really gives it a creepy realistic look. A lot of other "things" like this I've seen online are usually hard, made of sculpy or latex, tend to be stiff, this method gives a very realistic movement when the jar is moved - wasn't sure if it'd work, but I'm pretty happy with the results. Here's a very quick video showing that off.
I might at some point create a "Collector's Edition" of this, probably only one or two will be available, but each will come in an antiqued wooden case in which they can be displayed. No idea when this will happen though.
Here's the ugly little sucker before being sealed up in his jar. It's made from 2 layers of silicone, with small beads of Premo embedded between them for eyes. A layer of laxet that's been torn and distressed finishes it off. The silicone is untinted for a semi-translucent look, the image below was taking during sunrise and gives it a sort of delicate deep fried look, it doesn't normally look like that.
Here he is all snug in his jar of simulated Giant Mountain Troll bile to keep him fresh.
Using silicone to make this and adding on 6 thin tendrils really gives it a creepy realistic look. A lot of other "things" like this I've seen online are usually hard, made of sculpy or latex, tend to be stiff, this method gives a very realistic movement when the jar is moved - wasn't sure if it'd work, but I'm pretty happy with the results. Here's a very quick video showing that off.
And finally, here they all are together. The smaller jars are $20 each, the two larger jars are $25. Normally in total they'd be $110, but I'm offering the whole collection up for only $95. One of the reasons, is because sometimes accidents happen in shipping no matter how well they're packed and the most used method with Canadapost offers $100 coverage - so there's some security in shipping at least. And I would, of course, recommend the faster methods - less handling means less likelihood of damage.
I might at some point create a "Collector's Edition" of this, probably only one or two will be available, but each will come in an antiqued wooden case in which they can be displayed. No idea when this will happen though.
Labels:
bloodworm,
creepy stuff,
Cthulhu,
faerie,
fetus,
foam,
jars,
monkey,
parasite,
random stuff,
resin,
rodeo,
sculpture,
silicone,
thing in a jar,
things,
troll,
worms,
yeti,
zombie
Monday, December 17, 2012
New prosthetics!
First, a couple updated pieces:
And an experiemental piece, a Skullcap Prosthetic. These are hard to say if they'll work for everyone. It's sculpted from a 21-1/2" head and John here has a 22-1/2" head and it fit really well on him. I'd say anything smaller wouldn't fit too well, but anything larger might work alright.
The Dust Troll
G'Lorn Demon
Sylf Demon
And some new stuff:
The Baalmoor Demon
Coshamis Demon
Quexital Demon
And an experiemental piece, a Skullcap Prosthetic. These are hard to say if they'll work for everyone. It's sculpted from a 21-1/2" head and John here has a 22-1/2" head and it fit really well on him. I'd say anything smaller wouldn't fit too well, but anything larger might work alright.
Labels:
baalmoor,
coshamis,
demons,
dust,
foam,
g'lorn,
Halloween,
horns,
latex,
makeup,
masks,
prosthetic,
quexital sylf,
skull cap,
troll
Saturday, December 08, 2012
"Things in Jars" again.
I thought I'd do up some images of the actual "Things" as they're not totally clear from the jar pictures, which is kind of the point, but from a selling point of view I think some folks might like to see what the "Things" look like.
I've only made 8 of each for now, we'll see how well they sell and than they'll only be made in a limited quantity. They sell for $15 each, the jars a re pretty high quality 8oz. jars, all sealed shut and coated with wax. The liquid is just water with the smallest drop of acrylic paint to make it cloudy.
Freeze Dried Two-Head Faerie
Haitian Bloodworm
Yeti Fetus
I've only made 8 of each for now, we'll see how well they sell and than they'll only be made in a limited quantity. They sell for $15 each, the jars a re pretty high quality 8oz. jars, all sealed shut and coated with wax. The liquid is just water with the smallest drop of acrylic paint to make it cloudy.
Wednesday, November 28, 2012
Demons, Calendars and Stuff
Been busy working on stuff, just a series of random stuff. Just finished shoot number 6 for the Demon Calendar - so far so good. Got the rest all lined up and shoot dates tentatively book for a few.
Meanwhile, I've pretty much wrapped up producing new prosthetics for the shop. I've got 3 female sized finished that all look pretty decent (I've got to come up with a better of way of phrasing that, female oriented? Female only? Whatever), they'll be going online, along with a few other pieces next week. As well, I'm working on a new large pair of ears and a new nose piece that should be ready for next week as well.
Since I'm running low on supplies I've been working out what best to focus on and I've decided to give latex pieces another try. Like horns and whatnot that you just slip on, no makeup required. I figure pieces like this might be more enticing for non-makeup oriented folks.
I've got an idea for a weird horned latex headpiece, might work, might not - but there's only one way to tell for sure. I think I'll do it up for a photoshoot and if it tuns out, I'll think about putting it online.
Here's a couple outtake shots from the last two shoots:
Otherwise I'm just trying to sort of some FX for the BZK! web series next summer, so far I've got some pretty cool stuff lined up and some of which will be for sale online. I'll be posting some progress about that once I make some good headway.
And I'm finally going to take a serious attempt at building a larger foam latex oven this winter. We'll see how that goes.
Meanwhile, I've pretty much wrapped up producing new prosthetics for the shop. I've got 3 female sized finished that all look pretty decent (I've got to come up with a better of way of phrasing that, female oriented? Female only? Whatever), they'll be going online, along with a few other pieces next week. As well, I'm working on a new large pair of ears and a new nose piece that should be ready for next week as well.
Since I'm running low on supplies I've been working out what best to focus on and I've decided to give latex pieces another try. Like horns and whatnot that you just slip on, no makeup required. I figure pieces like this might be more enticing for non-makeup oriented folks.
I've got an idea for a weird horned latex headpiece, might work, might not - but there's only one way to tell for sure. I think I'll do it up for a photoshoot and if it tuns out, I'll think about putting it online.
Here's a couple outtake shots from the last two shoots:
Otherwise I'm just trying to sort of some FX for the BZK! web series next summer, so far I've got some pretty cool stuff lined up and some of which will be for sale online. I'll be posting some progress about that once I make some good headway.
And I'm finally going to take a serious attempt at building a larger foam latex oven this winter. We'll see how that goes.
Labels:
calendar,
demons,
ears,
foam,
horns,
latex mask,
masks,
monkey,
prosthetic,
rodeo,
skull cap,
undead,
web series,
zombie
Subscribe to:
Posts (Atom)


